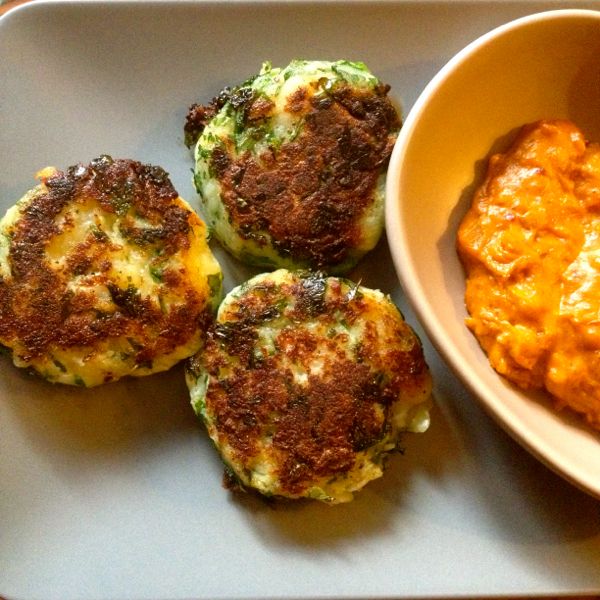
Ecuadorian Potato Patties

llapingachos

I am so invested in my Irish obsessiveness about potatoes that I always forget they are in fact South American in origin and am surprised when I see them in recipes from those regions. An Ecudorian cafe has opened near me and when I Googled what llapingachos were, secretly hoping it involved llama, it turned out to be potato cakes filled with cheese. I’m sure you understand nothing about those words disappointed me despite the lack of weird shaped animal.

Potatoes have become even more important to me since going low fodmap because basically they are my fall back option now when eating out. There are always chips on a menu and for some reason other potato dishes rarely contain onion or garlic. I will never go hungry when there’s a spud around but I like to add to my repetoire of potato recipes where I can.

The original version I found of these sounded lovely but distinctly heavy on the onions. They also come in a hominy corn version I reworked for the Brixton Blog and since I was making a batch of the accompanying peanut sauce, I thought I’d tweak them to be onion free.

I know some fodmappers won’t be able to do the mozzarella inside them due to the higher lactose levels in softer cheeses. You could try using parmesan which is very low lactose or making a lactose free bechamel sauce which you chill and use to fill them instead like potatoey croquetas. Or you could go carnivorous and use leftover meat from a roast or a bit of bacon in the centre instead? I’d say the world is your oyster, but that would be awful here…

Instead of onion, I’ve added lots of green scallion (only the white bit is fodmap unfriendly), fresh parsley and a bit of fresh coriander for flavour. Make sure to use nice starchy baking potatoes and you’ll get a great shape on the patties. I froze some and they cooked well straight from the freezer for a quick brunch that combined champ, potato bread and Ecuador in one.

Ecudorian potato patties with peanut sauce (serves 4)

For the patties:

  • 4 baking potatoes
  • 2 scallions, chopped (green part only if fodmapping)
  • medium bunch flat leaf parsley, chopped
  • medium bunch fresh coriander, chopped
  • salt and pepper
  • 125g mozzarella, grated
  • 2 -4 tablespoons vegetable oil

For the peanut sauce:

  • 4 tablespoons crunchy peanut butter
  • 250ml milk (non dairy or lactose free is fine)
  • 1 teaspoon ground cumin
  • 1 teaspoon smoked paprika
  • 1 teaspoon ground achiote (see below)
  • 1 teaspoon soy sauce (use tamari if wheat free)
  • 1 lime, juiced
  • salt and pepper
  • fresh coriander, chopped
  • 1 red chilli, chopped or teaspoon hot sauce (optional)

These patties are super easy to make. I had the best results baking my potatoes to keep them drier and starchier and by baking, I mean shoving the baking spuds I bought in the microwave whole two at a time for 12 minutes. If you have the oven for something else, then use that method.

Allow the potatoes to cool down enough to handle them and split them in half and scoop the middles out into a bowl. Add the scallions and fresh herbs and season and mix in well.

Wet your hands slightly and scoop out a handful of the potaro mix into a ball, flattening it slightly onto a plate or lined baking tray. Using your thumbs, push outwards from the centre to make a hollow. Fill with grated mozzarella and then cover the cheese up again with potato so it’s completely hidden. You may need a little pinch of extra potato from the bowl.

Repeat until you have between 10 and 12 patties. Any cheese that doesn’t fit works incredibly well straight into your mouth as you put the patties into the fridge to chill for at least 30 minutes. They’ll be fine in there for up to 24 hours so make ahead if you like.

When you are ready to eat them, heat the oil in a frying pan on a medium high heat and fry the patties for about 3 minutes each side. They should get a nice crisp crust without burning and the cheese is melted. I did about 4 at a time and kept the first batches warm in a low oven.

As the patties fry, make the peanut sauce by mixing the peanut butter with the milk over a low heat. I used the Sainsbury’s Basics peanut butter I had which is slightly sweetened and it was fine so don’t worry about fancy stuff if you don’t have it.

Add the spices once the peanut butter and milk combines. Achiote is a seed used in South American cooking (and known as annatto in the Caribbean). It adds a warm yellow colour and a slightly spicy flavour not unlike nutmeg. It’s not fodmap tested and if you don’t want to use it or can’t get it, substitute it with 1/2 teaspoon more of paprika and 1/2 teaspoon of nutmeg. Add the juice of the lime and the soy sauce and then take the peanut sauce off the heat and stir through the fresh coriander and chilli if using.

Serve the patties as hot as possible with the peanut sauce on the side and some fried eggs on top. A little tomato salsa or avocado if you can eat them wouldn’t go amiss either. A dish like this reminds me why brunch is a brilliant thing.


Fodmap Friendly Chicken Liver Pate

pateA recent health glitch involving the gallbladder I had removed when I was 18 means I’ve been stuck in the house recuperating for the last week or so. In between Googling to see if I need to see a gastroenterologist or an exorcist, I’ve almost been enjoying being round the house so much. The last few months have been a whirlwind of activity and it’s oddly comforting to have the chance to start doing more cooking than I’ve managed recently.

Coinciding with the weather becoming distinctly autumnal, the slow cooker has come back into action for more than just a whole chicken or a shoulder of pork and I’ve been enjoying de-fodmapping recipes from Slow Cooked and rediscovering some old favourites. I’ve also been meal planning again rather just eating variations of meat, rice and spinach for dinner every night in a fodmap inspired food funk.

I’ve managed to roast a chicken, make soup from it and whip up a batch of ragu that filled the freezer and made some Tuesday night cannelloni so far in the slow cooker. I felt extremely organised in between naps until I realised I’d managed to forget to put the chicken livers I’d defrosted into the ragu…

Armed with a tub of previously frozen offal and the memory of having to chuck a bag of mince in the bin the previous week because I’d been too ill to eat it, I couldn’t bring myself to throw more food out and my mind turned to pate.

I love love love pate. One of my great comfort foods has always been pate on toast. It’s a thing of joy to have a good pate filled with duck or chicken livers whether you go for rugged and chunky or smooth as silk. I even like the ones of more dubious provenance piled inch thick on toasted cheap white bread. Pate is my jam.

Except that all pate one can buy contains alliums. It’s a festival of shallots/garlic/onions/delete as applicable and thus out of the reach of my sticky little paws now. Even my own slow cooker version uses shallot. And just to add annoyance, there is often dried fruit too. I needed to adapt it but not lose flavour.

I decided to go creative and try to use up leftovers. A half drunk bottle of red wine went over the chicken livers to marinate them and depth. Since I’m supposed to watching my fat intake so as not stress my gallbladder area out and I’m not up to going out to buy double cream, I roasted some pumpkin with caraway seeds and fresh thyme to use instead. I browned some butter and fried the livers lightly in it.

Everything got blitzed together with a splash of brandy and it all went into the slow cooker in ramekins. Once cooked and cooled, I covered the tops of the ramekins with clarified butter and froze the ramekins inside a bag. Each one takes about an hour to defrost so I can have no fuss, low energy allium free lunches with ease and extra smugness.

Fodmap Friendly Chicken Liver Pate (serves 4)

  • 250g chicken livers
  • 100ml red wine
  • 100g pumpkin (or sweet potato if not sensitive)
  • 150g butter (see below for instructions)
  • 1 tablespoon caraway seeds
  • 4 sprigs fresh thyme
  • salt and pepper to taste
  • 1 tablespoon brandy or red wine
  • dash lemon juice

Whether your chicken livers are fresh or frozen, it’s best to gently rinse them and remove any discoloured patches. Then carefully remove the gallbladders that are attached. These make the pate bitter otherwise. The irony of doing this to a chicken while my body was reacting to someone doing it to me was not lost on me. At least they gave me the good drugs at the same time.

Put the chicken livers in a non metallic bowl and put the red wine over them. Marinate for at least an hour or preferably overnight. This is the one time it’s appropriate to soak your liver in red wine.

While the livers do their thing, roast your pumpkin (or sweet potato or butternut squash if non fodmapping). I buy wedges of pumpkin in Brixton market and roast them chopped into chunks with the skin still on and then peel it off when it cooked.

You’re going to go through the cooking life cycle of butter next. Put all 150g in the pan, chopped into small cubes and melt it gently. Simmer it until it starts to foam and reduce and when the foaming dies down and it stops moving, pour half the butter through a sieve that you’ve lined with some muslin or a clean cloth into a bowl. The clear butter you collect is your clarified butter. Set aside until needed.

Then brown the remaining butter. Keep stirring it over a slightly higher heat and let it heat until the butter foams furiously again and turns brown and smells nutty but not burned. Watch it closely and take it off the heat at this point, pouring it into a clean bowl to cool slightly. You need to do this even though you’re going to cook in it because otherwise it will burn when you heat it again.

Heat the browned butter in a frying pan on a medium heat and when it bubbles slightly, add the chicken livers and the fresh thyme and caraway seeds. Keeping the livers moving the whole time, cook it all for 2 minutes. It’s fine if they are still pink in the middle.

Take the pan off the heat and tip the contents into a large bowl along with the cooking juices, add the pumpkin and lemon juice and with a handblender, blitz it all until it is smooth and silky looking. Add the splash of brandy and put into ramekins.

Set these in the slow cooker crock and fill it halfway with boiling water and put the lid on and cook on low for 2 hours. Or set them into a roasting tin, fill halfway with water and bake in the oven at 140℃ for 45 minutes. Either way when cooked, lift out of the water and allow them to cool.

Pour enough of your clarified butter over each cooled ramekin of pate to cover the surface well. You may need to melt it again first. You don’t want it an inch thick but enough to be noticeable. Allow it to cool and thicken. Pop the ramekins of pate in a freezer bag and seal. Freeze for up to 3 months or eat the pate from the fridge within 3 days.

I was delighted that I froze three quarters of my pate because when I started eating it in front of Don’t Tell The Bride that evening, it was so beautifully smooth and delicious I could have worked my way through the whole lot in one sitting. This way I got to feel smug that I was pacing myself and lying in bed eating pate instead of letting a man organise me a wedding I would hate. What a perfect evening.


Pork and Lemon Balm Spelt Salad

pork spelt salad

If I’m honest, I have blogged little recently and cooked even less. Other people get inspired by hot summer weather and create wonderful meals of seasonal produce to be eaten outdoors. I tend to hide indoors eating a Magnum for dinner in front of an open window which is blissful but hard to write about.

My summer eating has also been cramped (literally) by the whole Fodmap thing. All stone fruit are a no-no. One small roasted flat peach the other week made me so ill I had to spend the next day in a darkened room with a fruit induced hangover basically. Asparagus is out. So are avocados. Corn and peas are only allowed in homeopathic amounts. Cherry tomatoes are causing issues. My innards wish it was mid winter and they could have some nice swede and curly kale.

Thank god for spinach is all I can say. Sometimes you just need something green and leafy and it does the trick. But it’s not what I’d call filling so I’m always looking for ways to bulk it up a bit. My friend Alex is a fellow Fodmapper who has issues with the wheat-rye-barley school and she introduce me to pearled spelt recently as a barley alternative.

Sadly much more expensive and only really available in Waitrose or through Sharpham Park, pearled spelt looks very like pearl barley but is more robust and hearty. It would be great in soups where I love that chewy grain texture but I’m wishing winter back again to talk about that, so I made a spelt salad.

I’m eating a LOT of meat right now. I’m trying a higher protein diet for gut issues generally while I learn more about leaky gut syndrome and auto immune illnesses (warning: Google is full of woo on this subject so read carefully) and because with most fruit and veg and all pulses being excluded and cheese limited, I don’t have many other choices. You need much more protein to fill you up when you can’t really bulk up on fibre as well. I’m trying to eat a variety of types of meat and fish and vary the cuts to keep it interesting.

I got a pork tenderloin inexpensively in Tesco recently (somewhere I alamost never shop but went into to enjoy their air con). Still a well priced cut, there’s no waste on it and a whole one does me about four meals. I combined it with some impulse purchase lemon balm, green beans and spinach and drizzled it with a lemon vinaigrette. It was delicious, but if anyone has any tips on giving vinaigrette a new twist or can suggest other Fodmap friendly dressings, please let me know!

Pork and Lemon Balm Spelt Salad (serves 4)

  • 450g pork (I used tenderloin or fillet)
  • 150g spelt (uncooked weight)
  • 1 lemon, zested and juiced and 1 lemon sliced
  • 1 courgette, sliced
  • 150g green beans
  • 1 tablespoon garlic oil
  • 1 big bag spinach
  • 50g green olives
  • 4 stalks lemon balm
  • small handful fresh parsley
  • small handful fresh chives
  • 2 tablespoons olive oil
  • 1 tablespoon white wine vinegar with a dash of lemon juice
  • 1 heaped teaspoon Dijon mustard
  • salt and pepper

Start by soaking the spelt in cold water for at least half an hour if you have time. I did mine in the morning and left it all day. It makes it quicker to cook, saves on labourious washing and gives a lovely texture to the cooked grain.

Add the soaked spelt to a large pan and cover with cold water and bring to the boil. Simmer and cook for about 20 minutes or until the spelt still has slight bite but is cooked. Drain and allow to cool for about 15 minutes.

Season the pork well. Seal it on each side for about 2 minutes to add some colour and then lay out some tinfoil and set the sliced lemon on it. Wrap the pork up in the foil like a parcel and pop in the oven for 12 minutes on 180 ℃. Leave to rest for 5-7 minutes and then slice thinly.

While the spelt is cooling, slice your courgette and fry in the garlic oil (remember Fodmaps are not oil soluble so garlic oil is fine). When they are cooked, dry fry the green beans in the remaining oil until slightly softened. Add both to the cooked spelt along with the lemon juice and zest.

Make the vinaigrette by combining the olive oil, vinegar and mustard and mixing well. Tear the lemon balm with your hands. It will discolour if you use a metal knife. Toss it into the spelt along with the sliced pork and add the chopped parsley and chives. Add the spinach and the olives and toss it all well so the warmth of the pork wilts the spinach just slightly.

Serve and eat outside if possible to give you that proper summer feeling. Excellent with a Magnum for afters too, preferably a Dark Espresso one…


Duck Ham or Prosciutto

duck bacon

A few years ago, I discovered how easy it was to make your own bacon and Mister North and our mum followed suit, making their own guanciale and bacon on several occasions. It’s certainly given carbonara and an Ulster Fry a new lease of life in our family.

I’d wondered for a while if you could cure pig’s jowls or belly, what else could get the sugar-salt-saltpetre treatment and decided to try making duck bacon for Christmas. I got massively distracted and the duck breasts I bought for the purpose got left in the freezer until a few weeks ago. I wanted something simple but effective to make while working on other stuff and this seemed just the ticket.

On a semantic note, I found it hard to tell what the difference between duck ham and duck bacon was when researching the idea. Tim Hayward in Food DIY uses a cure close to my bacon recipe but calls it ham and most recipes from American food bloggers seemed to call it bacon when it had been smoked rather than simply cured and air dried. Lots of other people described it as duck prosciutto. I’m still not sure what to call it apart from very easy and incredibly delicious.

Duck Ham/Prosciutto/Bacon

  • 2 duck breasts
  • 200g sea salt
  • 200g sugar
  • 3 tablespoons fresh thyme, chopped
  • 1 tablespoon juniper berries, crushed
  • 1 tablespoon maple syrup or treacle
  • 1 tablespoon lapsang souchoung tea leaves
  • 1 teaspoon coarse ground black pepper
  • 1/4 teaspoon saltpetre (optional)

This is ridiculously easy and works just as well without the saltpetre as with, but had a slightly richer more ruby colour to the meat when I used it. The lapsang souchoung tea leaves add a smoky note that works beautifully without having to start rigging up a smoker or adding the heat of any kind of chilli.

Lay the duck breasts skin side up in a non reactive container. I used one of my many many tupperware boxes after having had ziplock bag disasters before.

Mix the salt, sugar, herbs, pepper and tea leaves (and saltpetre) together and add the maple syrup or treacle to it all to make a thick barely spreadable paste. Smear some onto the skin of the duck breasts and then turn over and cover the meat well.

Put the lid on the box and leave it all to cure in the fridge for 3 to 5 days. The cure will create a brine and it’s best to turn the breasts everyday in this to cure it evenly. I forgot about mine after 3 days and left it for another 2, ignoring it somewhat.

When you remember about it again, take the breasts out of the cure and wrap in a clean muslin cloth. Hang this little muslin parcel up somewhere not too warm and away from pets to air dry. I use the clothes airer in my bedroom but it would be fine in a garage or cold hallway as well.

After 5 days, unwrap your duck breasts and slice as thinly as possible to serve. It will have a subtle smoky and herby flavour that goes very well with a kale salad and roasted tomatoes for lunch or topped with sauerkraut, pickles and cheese in a Reuben inspired sandwich along with a quick Thousand Island style dressing with mayonnaise, ketchup, onion, gherkin and a little green chilli all blitzed up together. This was so delicious I forgot to take any kind of photograph of it. I think I barely used a plate I was so keen to eat it.

This is a great way to make a duck breast go a long way and serve several people making it both economical and incredibly impressive looking as a dish. Your use of it is only limited by your imagination!

Trinidad Pastelles for Christmas

steamed pastelleI’ve been working on several pieces for the Brixton Blog over the last few weeks about what different cultures and nationalities do for Christmas and my attention was particularly drawn to pastelles from Trinidad as these parcels of filled cornmeal steamed in a banana leaf sounded like the perfect way to try out my new electric steamer-slow cooker in style. I’ve also always wanted to use banana leaves and I’d never seen them until now to buy. If you can’t get them, then wrap your pastelles in greaseproof paper instead. These are traditionally eaten on Christmas Day but I think they’d be a great way to use leftovers in style so I’m publishing the recipe today so you can buy cornmeal alongside your Big Shop you’ll be doing later…

Originally published on Brixton Blog Read more