A Savoury Cream Tea

biscuitsConfession time. I don’t have any opinions on the cream tea at all. I don’t love it, I don’t hate it, I’ll eat it if it’s there. I really don’t care if you put the jam first or the cream first. My only rule is don’t put raisins in your scones. No one likes raisins in scones.

However I do like other things in scones. Cafe Renoir in Belfast (the one in Queen’s Street was a beloved day time hangout of mine when I was a teenager ) is the spiritual home of scone and offered up some great takes on them. I loved their pineapple and coconut ones and may have stampeded the queue when they had the white chocolate and raspberry ones. I also make treacle and ginger soda bread scones quite often at home. I am not a scone purist at all. In fact I find the plain scone a little, well, dull sometimes.

The problem with the plain scone is that they need to not just be nice, they need to be excellent. I can’t make them to save my life, churning out leaden lumps that set your teeth on edge with baking powder. I lack the light hand to make fluffy golden topped scones that people ooh and ahh over. I’ve tried and neither Delia nor the wife of a Northern Irish minister who has made thousands of scones for the church over the years have been able to set me on the right path.

So I’ve given up and turned my attention to the American biscuit instead. More savoury than a scone and often made to be flaky rather than fluffy, something about them appeals to me more for making at home than scones. I’ve tried a version that simply involved double cream and flour that were more like fudge than anything else and worked my way through those involving lard instead of butter and they’ve been good, but not great.

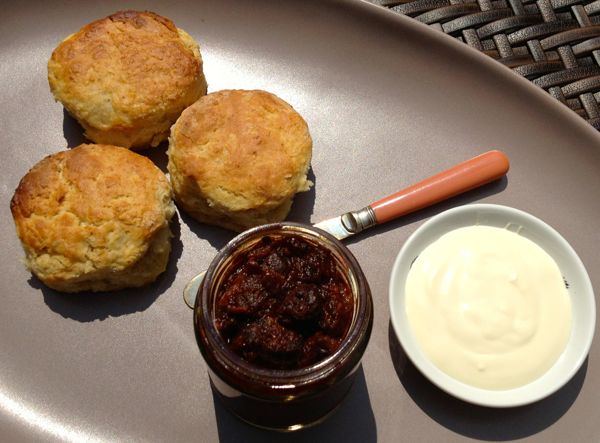
Then I came across this recipe from a woman in Tennessee with 5 stars reviews across the board (unheard of on the internet) and 17 tips to help make your biscuits great and the savoury cream tea was born. I topped these flaky biscuits with chorizo jam and thyme creme fraiche and suddenly I have many many opinions of cream teas again…

chorizo jamSlow Cooker Chorizo Jam (makes 5 x 300ml jars)

(Loosely inspired by Eat Like a Girl‘s dedication to meat jams)

  • 1 large white onion, finely diced
  • 25g unsalted butter
  • 500g cooking chorizo (or 250g chorizo and 250g streaky bacon)
  • 1 tablespoon wholegrain mustard
  • 1 tablespoon tomato puree
  • 1 tablespoon brown miso
  • 1 red chilli, finely chopped
  • 150ml apple juice
  • 60ml red wine vinegar
  • 2 tablespoons honey or maple syrup
  • 2 tablespoons brown sugar
  • 1 tablespoon smoked paprika
  • 1 tablespoon sweet paprika
  • 1/4 teaspoon ground mace
  • 1/4 white pepper
  • 1/2 teaspoon ground allspice
  • 1/2 teaspoon pul biber/Aleppo pepper (smoked Turkish chilli flakes)

This is the easiest thing in the world to make, which is a blessing since people are going to ask you for jars of it quite frequently. I imagine you can make it in a low oven of around 120℃ for about 4 hours, but you’ll need to check the liquid levels as it cooks to make sure it doesn’t cook dry. But since I am all about the slow cookers these days, I’ve barely remembered how to turn my oven on….

The chorizo jam is best made with soft cooking chorizo which is raw rather than the hard cured kind. I got mine at Brindisa but most of the big supermarkets will stock it. You could use the dried cured kind, but add about 75ml more apple juice to help it soften up.

The base of the jam is made with soft sweet caramelised onion to bring it all together and create a sticky jammy texture. Raw or barely cooked onion doesn’t work well here so don’t skip the first stage of the recipe.

Finely dice the onion to about 1cm dice and add to the slow cooker with the butter. Put the lid on the slow cooker and cook the onion on high for 4 hours or low for 8 hours. The slow cooker makes the best caramelised onions you can imagine so I quite often spent 20 minutes slicing or dicing a kilo or two of them and doing a massive batch. I then freeze portions or keep them in a sterilised jar in the fridge for up to a month and add them to dishes as needed.

Once the onion is caramelised, cut the chorizo into 1-1.5cm pieces and add to the slow cooker crock. The bacon should be thin strips if using. Add all the other ingredients and stir it all together well. I find adding them with the liquid in the middle helps bring it all together  more easily.

Pop the lid on the slow cooker and cook it all together on low for 8-9 hours. I did mine overnight and when I woke up the house smelled wonderful. I then sterilised some jars in the oven and bottled it. Keep in the fridge for up to four weeks.

While you are making the chorizo jam, multi task with making the crème fraîche as well. It takes about 18 hours to be ready, but requires very little actual effort. Making it from scratch allows you to customise it by infusing it with the flavours you like. It would be wonderful with rosemary or sage or garlic for a savoury version or with rose, lavender or lapsang souchong for a sweet version. Simply substitute the equivalent amount of thyme for the flavour of your choice.

creme fraiche

Homemade Thyme Crème Fraîche (makes 300ml)

  • 300ml double cream
  • 2 tablespoons dried or fresh thyme
  • 2 tablespoons cultured buttermilk or sour cream

Put the double cream in a small saucepan and add the thyme (or flavouring of your choice) and gently heat the cream to 71℃ exactly. You will need a thermometer for this. Do not heat the cream higher than this heat. 71℃ is the magic number to activate cream or milk to thicken (or develop into cheese) and is sometimes known as ‘clabbering’ it. Some argue this is only the correct term if you are using raw unpastuerised milk, but since few words suit my Belfast accent better, I will continue to use it even if inauthentic.

Take the pan off the heat immediately and allow the cream to cool to 40℃. This will take around an hour and allows the thyme to infuse beautifully.

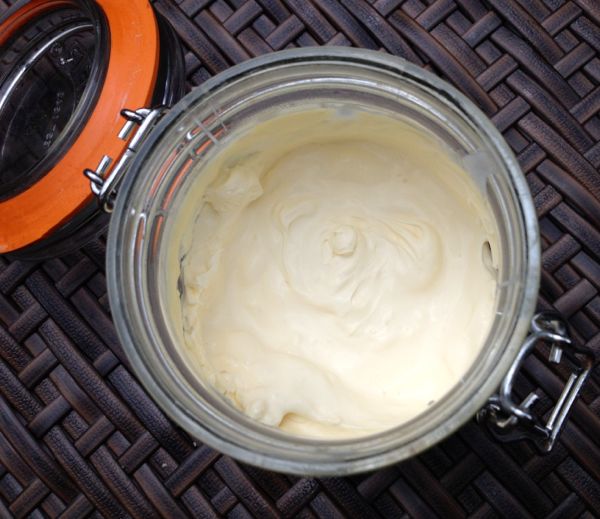
Wash out a glass jar in the hottest water you can handle and don’t dry it. Strain the cream through a sieve into it, leaving the thyme behind. Add the 2 tablespoons of buttermilk or sour cream and stir well. This ‘inoculates’ the cream and introduces the culture needed to turn from cream to crème fraîche. It is similar to the process of making yoghurt and both allow dairy products to last longer without spoiling.

Loosely cover the jar with its lid and then set it somewhere nice and warm to thicken up. I left mine right by the slow cooker that was making my chorizo jam as it gives out a nice waft of warmth. It will take about 12-14 hours to become a thick creamy texture that will hold the mark of the back of a spoon run through it. At this point, chill it for 4 hours to thicken up completely. Store in the fridge for up to 4 weeks.

Serve the chorizo jam and thyme crème fraîche on freshly baked biscuits you’ve split open. Your choice as to which you dollop onto the biscuit first. I’m not going near that controversy unless I’ve served an entire bottle of cava with my savoury cream tea and am too well refreshed to notice!

Fig, Raspberry and Tarragon Rolls

fig rollsLike many Irish people, I more associate biscuits with Jacob’s than McVities. This is a brand so Irish, it was even one of the places taken over in the 1916 Easter Rising as Ireland tried to break away from Britain and declare independence. Biscuits matter back home.

Jacob’s made all kinds of sweet treats when I was wee (it is now no longer an Irish company and cases are fought in court over the name.) Mister North and I could recite the Kimberley, Mikado and Coconut Cream jingle in our sleep, but most of all Jacob’s was associated with Fig Rolls.

They came in an orange packet in those days and our mum was rather fond of them so we always had some in the biscuit tin. I loved them because no one ever commits the disgusting depraved act of dunking a biscuit when they eat a Fig Roll. I have always wondered like the advert asked ‘how they get the figs in the fig rolls?’ and decided the time had come to find out.

Partly inspired by a Greek Fig Pie our dad sent me recently with its spiced fig filling and sesame seed outer and partly by this recipe on the fabulous Food 52, I decided to try baking my own and see if I could have a fig renaissance in my life. The one drawback of a Fig Roll is that they are teeth-itchingly sweet so I added some frozen raspberries to the fig mix to add a little tang.

And to prove I’m a grown up instead of a biscuit tin raiding child, I added a little tarragon to the raspberries as they are perfect bedfellows. In fact the most memorable cocktail I’ve ever drunk involved fresh raspberries and tarragon and gin and I’ve been borderline obsessed with this combo ever since. Told you I was a grown up now…

Fig, Raspberry and Tarragon Rolls: adapted from Food 52 (makes about 40)

For the dough:

  • 75g room temperature butter
  • 100g brown sugar
  • 225g plain flour
  • 1 teaspoon baking powder
  • 1 large egg
  • 2 teaspoons vanilla extract

For the filling:

  • 250g dried figs
  • 300ml boiling water
  • 200g fresh or frozen raspberries
  • 5g fresh tarragon

The dough is best used after chilling overnight so prepare it in advance. It will keep for about 10 days in the fridge if you get sidetracked mid recipe like I did.

Beat the butter and the sugar together with an electric whisk until they are very light and fluffy. This will take about 5 minutes. Add the egg and the vanilla extract and beat until loose and smooth.

Stir the flour and baking powder into this mixture until just combined. It’s a soft almost loose biscuit dough so handle it carefully. Roll into a ball, flatten into a disc and wrap in clingfilm. Chill for at least 6 hours or overnight.

About an hour before you want to make the fig rolls, chop your dried figs into small pieces. I cut each one into six. Put them in a pan with the boiling water and bring to the boil. Simmer until they are soft and plumped up. They should have absorbed all the water. Keep an eye on them as they are thirsty wee things and you might need to top the pan up again.

When they look like they have absorbed as much water as they can without falling apart, take them off the heat and blend well with a stick blender. You will end up with a very smooth pale purple paste. Set aside to cool.

If you are using frozen raspberries, allow them to drain well into a bowl at this stage. If you are using fresh ones, squash them lightly with the stick blender. Chop the tarragon roughly, add to the berries and set aside until the figs are cool.

Combine the figs and the raspberries and then spoon the fruit into a icing bag. They are ferociously sticky so don’t overfill it.

Take the dough out of the fridge and cut the disc into four. Keep one out and return the rest to the fridge. Flour your surface and roll the dough out into a long rectangle about 4 inches by 10. Knock the sides into an even shape with the rolling pin. The dough is fragile and might crack. I sacrificed the very ends rather than push my luck.

Using the icing bag, squeeze four stripes of fig and raspberry paste onto your dough and then fold the sides over. Wet it slightly to allow the top the layer to stick. Cut this fig filled sausage into 1.5 inch pieces and set on a lined baking tray. Repeat with the other three pieces.

Bake the fig rolls in a 175℃ oven for 14-16 minutes. The dough should be golden on the edges but not the top. Take them out of the oven and immediately put the piping hot biscuits in a large Ziploc bag and seal it up. This steams them and keeps them soft like a proper fig roll. I often do this with soda bread too and it works a treat to keep the crust smooth and soft.

When the fig rolls are steamed and cooled, serve with a cup of tea. The remaining biscuits will keep up to 10 days in a tin. The filling in them is lovely. Much more generous than Jacob’s ever was and not as sweet. The dough tastes exactly like the bought ones and they are even easier inhale alongside your cuppa with their soft texture. Much more fun than just opening a packet!


Cashew Nut Blondies

cashew blondiesAs I might have mentioned, I’ve been quite busy recently which has lead to the slightly bizarre scenario of being a food writer without the time to cook anything. What I needed was something low maintenance, very easy and with tonnes of impact for very little effort.

Oddly enough I found the answer to this quest in a disappointing jar of cashew butter. Since I’ve been lusting after some Keen nut butters for ages but unable to get them easily in South London, I impulse purchased a jar of the new Sun-Pat cashew butter instead.

I should have held out for the good stuff because this cashew and peanut blend was awful. Flavourless, limp and claggy, I couldn’t even eat the slice of toast I’d put it on as midnight snack. Staring blankly at a whole jar of the stuff, I took to Twitter to vent and some bright spark suggesting baking with it to rescue it.

I originally thought I’d make cookies like these but then I happened to be perusing one of my favourite sites Post Punk Kitchen and saw a recipe for peanut butter blondies and knew I had my answer. I love Isa’s recipes even if I tend to de-veganise them as I have here and adapted them in other ways.

Spiced Cashew Nut Blondies (makes about 12 medium size blondies)

  •  150g cashew nuts, roughly chopped
  • 2 tablespoons water
  • 2 tablespoons sugar
  • 1 teaspoon cinnamon
  • 1/2 teaspoon ground ginger
  • 1/2 teaspoon allspice
  • 1/4 teaspoon mace
  • 175g cashew nut butter or peanut butter
  • 50ml vegetable oil
  • 175g brown sugar
  • 50ml milk (non dairy milk works well too)
  • 2 teaspoons vanilla extract
  • 250g plain flour (use a gluten free one if needed)
  • 1/2 teaspoon sea salt
  • 1/2 teaspoon baking powder

Begin by taking some roasted salted cashew nuts and chopping them roughly so that each nut is in about thirds. You want a bit of bite. Melt the sugar and the water together in a small pan and add the spices. Stir it all well and allow to become a thick dark syrup. Toss the cashew nuts in the syrup and lay in a single layer on a baking tray. Roast for about 15 minutes at 200℃.

In a large bowl, mix the cashew nut butter and the oil together into a thick paste. Beat the sugar into it all. Add the milk and the vanilla. It will be quite runny. Sift the flour, salt and baking powder into the nut and sugar mix.

Stir it all well. It will combine easily into a ball that comes away from the edges of the bowl cleanly. Line a 9 inch square tin with baking liner or greaseproof paper. Tip the roasted spiced cashews into the dough and carefully mix them through lightly. Spoon the dough into the tin and flatten it out with the back of a fork.

Turn the oven down to 175℃. Bake the blondies for about 20-22 minutes or until the edges are golden brown. The centre should still be soft. Allow the blondies to cool completely in the tin and then cut into 12 squares.

These kept for almost a week in an airtight container and were a fantastic quick snack when I didn’t have time to do more than just grab something with a cuppa. The cashew nut butter wasn’t completely rescued by this as the taste was still a bit thin, but the texture was fantastic and I’d make them again with a decent peanut or cashew butter anytime. I might even re-veganise them too…

Homemade Vanilla Extract

IMG_4142

I’ve been meaning to post this recipe for a while as it’s completely changed my cooking and baking habits and after such a busy week, it’s nice to to feature something simple and slow to develop. More like musing than cooking, it’s perfect after a fortnight that’s seen me submit the manuscript on the slow cooker book to Ebury, feature in the Metro and finish the three days of photography on the book, seeing my creations come to life in a way I hadn’t envisioned when I was eating them.

It was a real pleasure to collaborate with Mister North this week as he is the photographer for the book. My writing and his photography was enhanced by the wonderful food styling of Olia Hercules who was a real joy to work with. It was also great fun spending time with my lovely editor Laura Higginson. And of course having the excuse to eat all the food from the shoot. Very different to my previous life working in fashion…

I felt a pang when my borrowed slow cookers went back to the publisher this week and I comforted myself by pot roasting a chicken in my own one and baking myself a cake which is where the vanilla extract came in. A splash of vanilla in any cake, custard or dessert tends to lift it from good to glorious, but there’s no way round it, vanilla extract is expensive and I usually find myself rationing it like fine perfume.

However just before Christmas 2012 whilst perusing Ebay, I discovered that you can buy vanilla pods for a fantastic prices on there. Scoring 32 of them for £8, I assumed they’d at least have a hint of vanilla and look nice tied to Christmas presents or nestled into sugar. When they arrived however I could smell the rich sweet scent of vanilla through the package before I’d opened it. Unwrapped, each pod was sticky soft and left a sprinkle of vanilla seeds behind on your fingers like fairy dust. And that was just the A Grade pods. They go up to AAAAA in quality.

As with any excess of anything, I thought I’d stick them in some booze and see what happened. Three pods and a smidge of sugar went into some vodka for the perfect festive tipple. I also had a cheap bottle of dark rum left over from a mojito night and wondered what would happen if I put 10 in there and left it in the dark for three months? Vanilla extract that will knock your socks off and make those bottles of Nielsen Massey seem like The Body Shop oil you dabbed behind your ears at the age of twelve.

Rich chestnut brown, spicy sweet and utterly heady, this extract was amazing. The seeds melt into it to make it thick and glossy and the flavour is so intense you need half the amount you normally do. Considering those posh bottles retail at £4.70 per 100ml or around £47 per litre, making your own makes financial sense too. I made around 750ml of extract in December 2012 and gave small bottles of it as gifts, keeping some for myself. I’ve tested two cookbooks since then, baked myself silly and still have 150ml left. My vanilla beans are also currently brewing a second batch too which is just as intensely flavoured meaning I will probably never need buy commercial stuff again.

Homemade Vanilla Extract (makes 700ml)

  • 700ml dark rum
  • 10 vanilla pods

So simple to make. Simply split your pods so that they are opened out and flattened slightly. Pop them into a clean Kilner jar and cover with dark rum. I used Basics for this. Put somewhere dark and cool for at least 3 months. Shake the jar every few days to help infuse it all.

After 3 months, decant around 50ml into a small bottle and use. Leave the rest to keep infusing for up 9 months or decant it to give as gifts. I put half a pod into each small bottle to keep the infusion going and look pretty. I don’t bother to strain the extract as the seeds look beautiful to me.

Friends I gave this to asked for more for Christmas 2013 and I do actually have some waiting to be delivered! If you are a baker, this is a brilliant way to make the most of vanilla in your kitchen. You will never think of vanilla as bland or flavourless again once you’ve tasted this.


Manchester Pudding

manchester puddingLike everyone else in the world, I was planning on making pancakes this week. But being one of them there fancy food blogger types, I was going to do one version in advance to be published today, making me look smart and then have the standard ones tonight for tea as well.

My forward thinking/gluttony was sabotaged by the fact my non stick pan has given up the ghost. A omelette last week was unspeakable and yesterday’s attempt at boxty taught me something can be burnt and gluey at the same time. I wouldn’t dare try and flip anything in it today while I await my new cast iron pan from Sainsbury’s to arrive (their whole cast iron range is on offer currently.)

Instead I thought of other ways to use up the eggs I’d bought specially and my mind went back to this recipe for Manchester Pudding I’ve bookmarked ages ago. A rich custard is bulked up with breadcrumbs and baked and then topped with jam and meringue, it is the perfect pud when you have some spare eggs.

I made mine in the slow cooker as originally I thought I might use the recipe for the book but as the custards were baking, I counted my recipes and realised I’ve actually got more than 200 recipes and decided to blog it instead. I am totally loving the slow cooker as a giant bain marie. It’s so much easier than trying to lift trays of boiling water out of the oven and the steaming effect seems to make custards even creamier. In fact, it’s turned me from a custard catastrophe to to a custard champion. Perfect.

Manchester Pudding  (adapted from Simon Rimmer’s recipe here)

(serves 4-6)

  • 600ml or 1 pint whole milk
  • 1 lemon, grated
  •  few drops almond essence (optional)
  • 25g butter
  • 25g sugar
  • 100g white breadcrumbs
  • 6 egg yolks, beaten
  • 4 egg whites
  • 200g caster sugar
  • 1 teaspoon vinegar
  • 25g raspberry jam

I used individual ramekins for mine but you could use one large dish to make this. If you are using the slow cooker, check to see which fits best before you get to the stage of pouring boiling water round it.

Pour the milk into a saucepan and warm it gently on a medium heat. Don’t let it boil. Grate the lemon zest into the milk and allow the flavours to infuse. I added some bitter almond essence as well at this stage but this is non traditional and optional. Set the milk aside to cool for 10 minutes.

Add the butter and the sugar to the milk while bringing it back to a simmer. Stir in the breadcrumbs and combine well, allowing them to soak up some of the milk. Take the pan off the direct heat. Beat the egg yolks well in a small bowl and then add a splash of the hot milk and stir it well. This tempers the egg yolks and stop them from splitting or scrambling.

Pour the tempered yolks into the milk and stir it well. This creates the custard. Pour it into the ramekins or dish. Set it into the slow cooker crock. Pour boiling water carefully into the crock so it comes halfway up the sides. Put the lid on it and bake the custards for 30 minutes.

If you don’t have a slow cooker, set the dishes in deep roasting tin. Put the roasting tin in the oven at 180ºC and pour boiling water into it so it comes half way up the side of it. Bake the custards for 30 minutes.

While the custards cook, make your meringue. Put the egg whites in a clean grease free bowl and beat with an electric whisk for 1-2 minutes until they are frothy. Start adding the sugar gradually, beating all the while. This will create a lovely glossy meringue. Beat for about 5 minutes until the egg whites are in soft peaks and you can do the whole turn the bowl upside down thing. Stir the vinegar in. Spoon the meringue into a piping bag.

Check on your custards. They should be set but still wobbling. Add a dollop of jam and then pipe meringue on top the custard. This is much easier to do in the slow cooker where all you have to do is lift the lid off and lean over the crock. You’ll need to take the roasting tin out of the oven completely to do this.

Replace the lid of the slow cooker and allow the meringue to cook for 12 minutes or turn the oven up to 240ºC and bake the meringue for 8-10 minutes. The slow cooker meringue will be set but soft and sticky like the chewy bit in a pavlova or some marshmallow fluff. The baked ones will be crunchy and sticky inside. Finish the slow cooker puddings off under a hot grill for about 1-2 minutes just to give them a little colour.

Serve the puddings immediately or allow to cool. The slow cooker one will keep for up to 2 days in advance in the fridge. I love the soft gooey meringue combined with the thick creamy custard and don’t feel I’m missing out on pancakes at all with one of these left for dinner tonight!