Venison Christmas dinner, and the best leftovers ever…

Uncooked venison pieThe centrepiece of our Christmas dinner this year was a roasted leg of venison. Pretty good as it stands (ahem), but curiously, this tale ends up being all about the leftovers: the venison pie afterwards stole the show!

Cooked venison pie

My girlfriend’s family had served the roast venison a couple of Christmasses before, but it had overcooked disappointingly. I was given the challenge/opportunity to see if I could do it better. The roast recipe (see photo below) is from the Tatton Park estate, and I was handed a photocopy, complete with annotations. Now I like a good bit of venison, but hadn’t cooked a joint this size before, and was aware it’d need a bloody good basting to keep it tender. Hardly the hassle-free roast which is recommended for a peaceful Christmas Day, especially the first cooking for the in-laws!

Roasted joint of venison

I ordered the meat from Paul in the market (asking him to leave me the bone), and started work on Christmas Eve by making a stock … roasting the bones for 30mins before boiling up with a mirepoix and some herbs for a hour or so, until the stock tasted rich, robust and savoury. Venison’s very lean, but this yielded a creamy covering of fat, which I reserved and reformed for later use. While the stock was bubbling I also made up a batch of spiced Eastern European-style red cabbage. It’s normally better then day after making it, and has a good tang with caraway seeds, wild honey and bramley apple.

Spiced Red cabbage

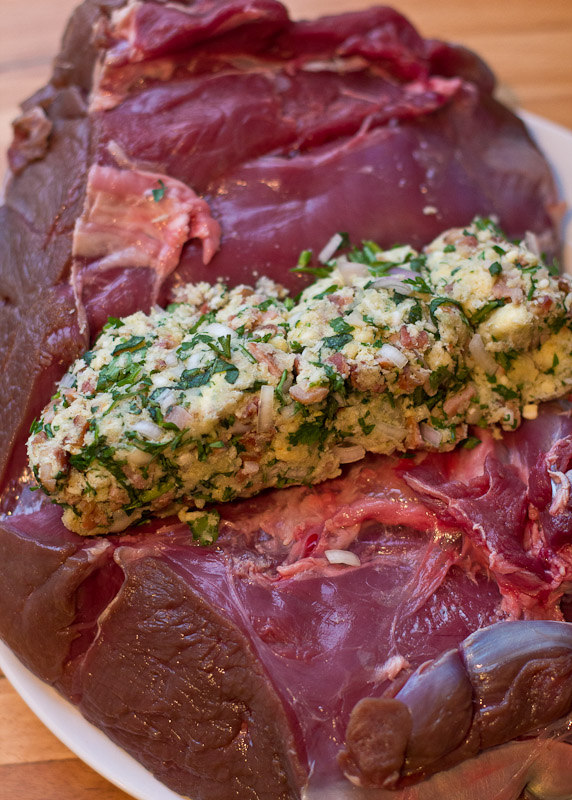
After their experiences with the venison joint I was a little wary of following the recipe to the letter, so on Christmas Day we got cracking by late morning. This gave us time for a slow, low cooking; although potentially less than the recipe called for. After making the Stilton, bacon and panko stuffing, this got rolled up inside the joint which was then retied. I also stuck spears of that venison fat into the flesh, to help lard it. I wrapped the joint tightly in foil for all but the last 40 mins or so, when the foil covered the whole roasting tin, so the juices could really get going. All in all it was probably cooking for a shade over three hours, basted regularly. The meat rested for a half hour while I whipped up gallons of gravy, deglazing the pan with port and using the stock to build up the flavour.

Christmas dinner 2011

After our Spiced Beef starters, our Christmas plate was finished off with hasselback potatoes, roasted parsnips, sprouts with bacon and chestnut, and sweet potato mash. A great spread, with plenty of flavour, variety and colour for the main meal. The venison was very tender and moist (phew!) and the taste was good and richly gamey, but not exceptional (admittedly this was up against the Spiced Beef, which was a real winner by any standards). We had a leftover meal on Boxing Day, with as many of the trimmings and accompaniments as our plates would hold, but we didn’t fancy eating rich slices of venison every day until New Year.

Pie ingredients

One of my Christmas presents was the OCD Chef’s Chopping Board (my friends know me too well) and I’d joked about keeping my scalpel in the kitchen with it. My inner designer feels totally at home with a scalpel blade, and I fancied building on a couple of previous attempts to decorate a game pie. With around half a kilo of cooked venison, and a gale blowing outside, pie seemed like the perfect prospect. A post-Christmas pie, made with Christmas presents, leftovers, and a nod to the frozen north…

We came home after a shorter-than-planned afternoon walk in the heavy winds – any hot port in a storm –  and we threw ourselves into making the leftover ‘pie to end all pies’. Venison, stilton and gravy were all to hand. This was to be rich, rumbustious and made to revel in the excesses of the Christmas period: game, port and piggy bits, but I had a sweet potato leftover to use up. I reckoned that, much like the butternut squash in my venison pasties, this token vegetable’d work well.

I rendered down the bacon fat, and melted some butter, along with a sprig of rosemary. Then in went a few shallots, the diced bacon, and some cubes of wild boar salami, followed after a bit by cubed sweet potato and a hare stock cube. The plan was to soften everything through, cooking gently and once that was done, it all came off the heat. We discarded the stuffing from the venison, and cut the meat into properly decent-sized chunks. Venison has a tendency to firm up if overcooked, so I reckon bigger was better, and should guard against dryness. The hunky chunks of deer got mixed up well with the other cooled, cooked ingredients, then I crumbled in generous handfuls of Stilton to the mix. It looked great.

There was probably about 330ml of gravy left over from Christmas Day (a handy size… can you imagine if they sold tins of real gravy next to the Coke and Irn-Bru?) so that got warmed up in a pan, along with  teaspoon of Gentleman’s Relish (the secret ingredient),

Cutting board and reindeer

some extra hare stock cubes, a tablespoon-sized blob of redcurrant jelly, and significant quantities of ‘cooking’ port. After thickening to a wonderfully rich, thick consistency this was gently and methodically poured over the pie filling in the dish.

I’d already rolled out the pastry (Jus-Ro’s finest… I didn’t fancy making puff (or rough puff) this time) and traced around the pie dish, gathering up the offcuts to make decorations with my trusty blade. Once the pie dish was filled we had fun with the decorations! I’m really pleased by how it came out… there was no over-arching theme but I did reference my other half’s Christmassy knitwear for the reindeer inspiration. After that we got busy making trees and stars, then fitted everything together in a 3D manner. I think I went a bit too heavy with the egg wash in places, but I love the seasonal tableaux we came up with. It’s certainly raised the bar for the next pastry creation!

The finished dish got cooked for about 40mins in a medium oven: I didn’t want to overcook the filling and this was just enough to puff the pastry topping up perfectly and the contents heated to a slight bubble. By the time it came out we were almost climbing the walls with anticipation… just enough time to get the celeriac mash and a healthy portion of the spiced cabbage on the side. Oh, the smell…

Venison pie and mash

And we’re talking about a full-on, revelatory moment on the first bite. Boom… a gloriously grown-up pie fest… with the tang of the stilton, the richness of the game, the sweetness of the port-laden gravy and sweet potato meltingly intimate together on a fork. Proper posh pie heaven. Big chunks of succulent meat and light pastry were so good together… I didn’t want to stop eating it. Next day the pie made a glorious re-appearance alongside some home-fried chips and peas on the side. Which, if anything, was better than the first portion, as the gravy and filling had mellowed and mixed even more. No point in dressing up the accompaniments… pie and mash, pie and chips. Dead simple, job done. Fan-bloody-tastic!

Venison pie and chips

PS. Drinks during the cooking were provided by the superlative Buxton Brewery (their cracking Wild Boar making its debut next to the aptly game in the kitchen): then we washed the pie down with a suitably Nordic brew, Einstök‘s Icelandic Pale Ale. I like my ales at anytime, but a pie and a pint is a marriage made in heaven. Happy Christmas, deer!

Baked Alaska Mince Pies

While there are many Christmas foods I adore, I just can’t get excited about mincemeat. It’s been several years since I ate a mince pie and feeling somewhat left out, I decided to make my own this year to see if I could get myself more enthused. Unable to get my hands on enough quinces to do jelly this year, I decided to get my fix by following Nigella’s Quincemeat recipe from page 265 of How to Be a Domestic Goddess and up the fruit content of those pies.

The quincemeat went into a jar in September to mature gently and I gave myself time to get excited. I was quickly distracted when The Little Loaf and I managed to find a date that we could meet for a pre-Christmas bake. An idea to do a winter inspired chocolate brownie Baked Alaska developed a life of its own when I heard about Sainsbury’s mince pie ice cream. We just had to do Baked Alaska mince pies instead! Talk about exciting…

We decided to each take a component and prepare it in advance and because we were baking at mine, I went for the ice cream. I wanted it to be inspired by that extra thick brandy cream people top their mince pies with and decided to push the boat on it. Using the foolproof custard from David Lebovitz as a base, I tweaked it slightly to be as rich as possible. You’ll need:

250ml (1 cup) whole milk (I used unhomogenised Jersey Milk)
500ml (2 cups) double cream
100g sugar
8 egg yolks (you could use 5 if you prefer)
pinch salt
dash of vanilla extract
good slug of brandy

Heat the milk and sugar gently to make sure all the sugar is dissolved. Add the cream and make sure it is nicely warmed. Then take a cupful or so of the warm dairy mixture and stir into the beaten egg yolks to temper them and stop them scrambling when you tip them all back into the milk mixture.

Gently add the tempered yolks into the warm milk and cream and cook over a low heat, stirring well. Use a spatula for this to make it easier and because you’ll know when the custard is ready when it coats the back of the spatula.

Take it off the heat immediately. Pour into a metal bowl, adding the vanilla and brandy and either chill overnight in the fridge or make an ice bath inside another larger bowl. Then once nicely chilled, pour into your machine and churn as standard. About five minutes before the end, gently add in about 250g of the quincemeat, a tablespoon at a time and let the machine mix it in well.

You’ll need scoops of ice cream for your mince pies so if you want you could shape the scoops now and freeze them on a plate or simply place in a container with a lid and freeze as normal. You can soften it slightly and do the scoops when needed but you’ll need to re-freeze them for at least two hours to prevent a fit of melting that would alarm even a climate change denier.

It was all a bit Blue Peter for me when the pies were assembled as The Little Loaf had made this beautiful clementine pastry and had rolled it out, pricked with a fork and blind baked it while I turned 3 egg whites, a teaspoon of cream of tartar and 100g of caster sugar into some meringue with the help of a hand whisk.

A scoop of ice cream went into a cooled pie case and the meringue was piped in with a disposable bag and a large star nozzle. Piping gives lots of surface area to crisp up and looks lovely, but you could also smooth the meringue over with a mini spatula and rough up with a fork. Make sure there are no gaps either way and then put the piped pies into the freezer for about 20-30 minutes.

Get the grill nice and hot and then toast the pies under it for about 2-3 minutes. Do not take your eyes off them for even a second. Meringue has a nasty habit of turning without close supervision. You can like us finish the meringue off with a blow torch for extra toastiness (and dinner party entertainment) but be careful the whole thing doesn’t ignite! Meringue is surprisingly flammable.

Serve your pies immediately to get the maximum mixture of buttery pastry, creamy cold ice cream and and crispy crunchy meringue. These Baked Alaskas are smooth and sweet with just enough bite from the quincemeat and the brandy not to be sickly. I’d use a bit less cardamom in the quincemeat in future, but otherwise this was pitch perfect. I think I’m a total mince pie convert now…

Guinness Pumpkin Gingerbread

Christmas isn’t Christmas without the scent and taste of spices in the air and on the tongue. Last year I indulged with doughnuts and mulled cider. This year, my appetite whetted by the parkin, I decided my Christmas spice had to come from gingerbread. I intended to make hard gingerbread people made extra festive with gold leaf, but my dough refused to play ball and I ended up with something more akin to sticky Play-doh. I sought solace in booze and a stack of Nigella’s recipes to see if I could find a foolproof gingerbread recipe.

And lurking in Kitchen, but also available online was the truly tempting sounding Guinness Gingerbread that combined dark sticky stout with dark sticky treacle and spice. I was instantly sold. Except I didn’t have any sour cream or even emergency yoghurt. I didn’t have time to go out and hunt any down (sour cream is surprisingly elusive these days. It’s all creme fraiche instead.) But I did have some leftover buttermilk and half a can of the pumpkin leftover from the ice cream. Despite the lack of success with that, I knew the pumpkin works well in baked goods, adding amazing moisture. Mouth watering, I got baking…

You’ll need:

150g butter
300g golden syrup (or use black treacle if you have it. I did half and half)
200g dark muscavado sugar
250ml Guinness (this is about half a bottle and you can use any stout)

2tsp ground ginger
2tsp ground cinnamon
1/4 teaspoon ground cloves (or as I had none, I used mace)

300g plain flour
2tsp bicarbonate of soda
150g pumpkin or squash puree
150ml buttermilk (or leave out the pumpkin & buttermilk and use 300ml sour cream)
2 large eggs

Then prepare yourself for the easiest baking recipe in the history of the world. Line a 20x30cm deep baking tray with parchment. Then melt the syrup, treacle, sugar and Guinness in a pan. This will smell amazing.

Sift the flour and bicarb and spices into a nice big bowl and then pour in the melted treacle Guinness mix and half combine. Then add in the beaten eggs, buttermilk and pumpkin puree and combine the mixure lightly until just properly mixed. Don’t overbeat or you’ll knock the air out of this beautiful batter. Pour the batter in the lined tray and then bake at 170℃ for around 45 minutes or until the gingebread is a glossy dark brown on top and coming away from the edges slightly.

Then comes the tricky bit. Your house will smell sensational, all spicy and treacly and sweet and you will have to wait at least 20 minutes for the gingerbread to cool and firm enough to get it out of the tray and cut in pieces. This will test your limits. You’ll want to get the kettle on and your chops round a sticky piece of gingerbread sooner, but it is worth the wait.

Unbelievably moist, but firm and springy from that fortifying Guinness and with the most wonderful spicing, this is the stickiest, moistest most Christmassy gingerbread possible. Served slightly warm with a scoop of good vanilla ice cream it would make a great dessert. I iced some of it with simple icing sugar and water mix with a teeny splash of the leftover Guinness to make it more a cake. The un-iced stuff lasted well in a tin, growing softer and stickier each day, allowing you to make this and have it ready for visitors with ease.

Just remember to keep your last piece to put by the stockings for Santa on Christmas Eve. He’ll come to your house first next year after tasting gingerbread this good…

Candied Peel

I love love love candied peel. I used to run to the baking cupboard and cram spoonfuls of it in my mouth when my mum wasn’t looking. It was my favourite bit of any fruitcake or barmbrack. This is especially odd since I don’t like oranges as a fruit, juice or flavouring, and generally eschew citrus fruits of all kinds. But mellow those citrus rinds in vats of sugar and it’s hypnotic to me.

An inability to read recipes a few weeks ago meant I ended up with an overabundance of grapefruits when making marmalade for cake and found myself wondering what to do with them all. A casual Twitter conversation about Christmas preparations brought about a massive lightbulb moment. I would make my own candied peel. Never mind if it was incredibly faffy and complicated: I could rise to the challenge!

Imagine my glee when this Waitrose recipe popped up and I realised candying my own peel was actually easier than pie. Radio on, sleeves rolled up, I set about peeling and de-pithing my citrus fruit. I had a mix of pomelo, ruby grapefruit, lemons and orange, but avoided limes as I thought it might be too overwhelming, like cordial.

Get four pans going on your hob and simmer the peels separately in hot water for about 20 minutes to soften them up. Then split the peels into two pots to simmer in the syrup. I actually made two batches of candied peel and found it easier to keep the peels bigger and cram less peel into the pans as they bubble and soak up the sugar. I just did two batches of the syrup to be sure nothing caught or burned. Keep the heat down low as you can, you only want the merest blip in the syrup to stop it getting bitter or caramelising. Then go off and do stuff while your house smells truly amazing…

I came back to my peel when there was still a tiny bit of syrup left, and lifted the biggest pieces out with tongs, laying them on baking trays. The smaller bits went into a sieve to drip any excess syrup off, as you don’t want so much syrup on the pieces: they dry crunchy and I didn’t fancy trying to boil my pan dry and win the challenge. I then left the trayfuls of peel in the living room to dry as it was the only place I had room, but the airing cupboard or anywhere the cat can’t walk on them will do.

About three days later, I turned the peel with tongs and left for another two or three days or until I remembered about it. I popped it in a ziplock bag, with a tablespoon or so of icing sugar, and shook it up to coat it and stop it sticking together. Some went into the Christmas mincemeat. Some went into cellophane bags to give as gifts. The rest was stored in a jar to be used for various festive recipes closer to the time and the leftover syrup stored for a drizzle cake or put on porridge or ice cream.

So if you didn’t do a cake on Stir-Up Sunday, impress people with homemade candied peel instead. You will never buy one of those tiny tubs again after you’ve tasted the citrus sensation of making your own. It tastes as good as it looks!

Twice as nice… our daily bread

It’s said man cannot live on bread alone. Considering this statement, I’m surprised organised religion remained so popular for so long on our wee island, when you think what a cracking range of Irish breads there are (veda, potato bread, soda farls and wheaten bread amongst others). I’m all for a bit of decent bread, slathered with butter, rather than some dour sermonising or happy clapping. I’ll probably be smitten down by the hand of a deity for saying that, but at least I’ll go with a smile on my face and a full tum…

Sundays are ripe for laziness*, cooking, and loafing around the house. Today’s mission was to make a decent and homely wheaten bread, to help counter the autumnal blues outside. However we’d been out drinking in Leeds yesterday (sampling some great ales from Leeds and Ossett breweries amongst others), and after a late night and a fuzzy head this morning, something special was required for breakfast first.

I’d planned to make baked eggs, following the recipe from the Parlour Café Cookbook. These have rapidly established themselves as a brekkie standby, not least because they’re so easy to cook. Their simplicity belies their deliciousness. I swapped the Parma ham from their original recipe with some slivers of locally hand-crafted air-dried ham from my friends at Porcus. Their rare-breed pork is heavenly, and I’m privileged enough to get samples of their splendid ham from time to time. These were perfect to line the ramekins, before cracking a hen’s egg in each. But I felt I needed something a tad more substantial to accompany these, so I made some potato bread – a family favourite – for the first time ever.

As Miss South’s previously explained, it’s meant to be made with leftover mashed potato, but that’s rarer than hen’s teeth in my house, so I quickly cubed and boiled up a few spuds, ran them through the potato ricer, then mixed in some plain flour & a knob of butter to create a light dough with a bit of bite. Proportions may vary depending on how waxy/floury your spuds are, but normally you want 4 to 5 times more flour than mash. Miss South’s said it before and we’ll say it again: potato bread is dead easy… it takes a Herculean effort to mess it up. A perfect compliment to any kind of ham and eggs…

Wheaten bread, otherwise known as brown soda bread, is another one of those wonderfully yeast-free breads we love back home. As with soda farls, the secret is the baking soda which helps it rise. You can buy it in many supermarkets, ready-made and branded courtesy of Paul Rankin; and both it and the more well-known white soda breads are gaining popularity on this side of the water. No wonder, it’s both healthy and oh-so-tasty. The ever-reliable Dan Lepard popped up on Women’s Hour’s “Cook the Perfect…” last week with his own take on it, and this spurred me on to do it the North/South way…

We’re a bit more old school in our family, and the core ingredients for wheaten bread are normally just flour, buttermilk, baking soda, and a pinch of sugar. Wheaten bread’s at least as easy to make as potato bread, especially if you have some Northern Irish wheaten bread mix to hand (thanks to my mum for bringing some across this summer). Of course, you can instead use a good mix of plain and wholemeal flour instead… but try and use as coarse and bran-heavy a mix as possible, as this really contributes to the flavour. In a mix, the baking soda’s already in place, so today all I had to do was add buttermilk and sugar.

I’m lucky enough to be able to get buttermilk in my local Morrisons, but I hear it’s hard to source in many parts of the country, so you can use full-fat milk and sour it with some lemon juice, or mix in some live yoghurt instead. Use roughly 3 parts flour to 2 parts buttermilk… in this case I used 500g of flour and about 330ml buttermilk, with a teaspoon of caster sugar just to bring out that nuttiness of the bran even more.

Mix it all up until you get a nice dough, not too sticky or overworked. Then normally I’d roll it out into a roundish shape, about 1″ / 3cm thick, before scoring the top into quarters. I dusted it with a little plain flour, but it’s also good finished with some chopped rolled oats.

As I was mixing the dough I realised I’d not made this for far too long; in fact since I went to Rotterdam to visit friends from all over Europe and enjoy a good shared meal. My Italian mate knocked up some fantastic food, so I thought it’d be right to bring a decent Irish loaf to add to the mix. Most people smuggle addictive substances out of the Netherlands: I may be the only person to have smuggled a loaf of wheaten bread in!

This is a bread with instant gratification in mind, with no leavening or proving required. I baked this straight on the shelf in a pre-heated oven, rather than on a tray, for 35mins (200C/400F/Gasmark 6) straight. Once it came out, sounding hollow when tapped, it had to sit and cool down on a wire rack. This is one of my strongest kitchen memories as a kid. I used to hang around, greedily watching while my mum baked glorious bannocks of wheaten bread, but the hardest part was waiting for them to cool, far too slowly, on a wire rack, with a tea towel covering them. As I found out today, self-control still isn’t one of my strong points when it comes to wheaten bread, even after all these years. We succumbed while the bread was warm enough to melt great slatherings of butter.

Simple and effective with good butter, though I had a last-minute hankering for a bit of blue cheese, which works so well with the nutty sweetness of the bread. Cashel Blue would be the natural Irish choice, but I was able to pick up some very decent Jervaulx Blue instead, which I enjoyed along with a pot of Yorkshire Tea. Living just inside West Yorkshire, it seemed a perfect choice. It also makes superb toast. If you’re looking for something a little more special, slices of buttered wheaten bread alongside some good Irish smoked salmon, finished with a sprig of chervil, a squeeze of fresh lemon juice and some cracked black pepper is to die for.

*”Oh wheaten it be nice…” with apologies to the Small Faces…