Homemade Mikado Biscuits

mikado 1

I have been on a bit of a biscuit roll recently (if you’ll pardon the pun) and rediscovering all kinds of childhood tastes. I blame that re-run of Nigel Slater’s biscuit programme because it’s certainly not just a desire to cram biscuits into my mouth. Oh no.

I loved making the fig rolls and I loved revisiting the Kimberley, Mikado and Coconut Cream jingle of childhood in my research for it, but honestly didn’t think anymore of it, especially since I was never quite sure which biscuit was which and preferred to say it as it’s all one word. I half thought of looking out for a packet of them if I was in an Asda soon with their weird ‘ethnic Irish’ grocery section.

My attention was actually all about the homemade teacake. I had heard about the rose infused version at Restaurant Story in Bermondsey recently and it got me thinking about playing around with having a go at something similar when some friends came for midsummer afternoon tea.

I’ve had this fantastic sounding recipe for teacakes from the ever wonderful The Little Loaf in my ‘to make’ folder for ages and thought I’d adapt it to make rose marshmallows again and spread the biscuit with rose petal jam. They sounded like they’d go well with a little Pimms on the patio in fact.

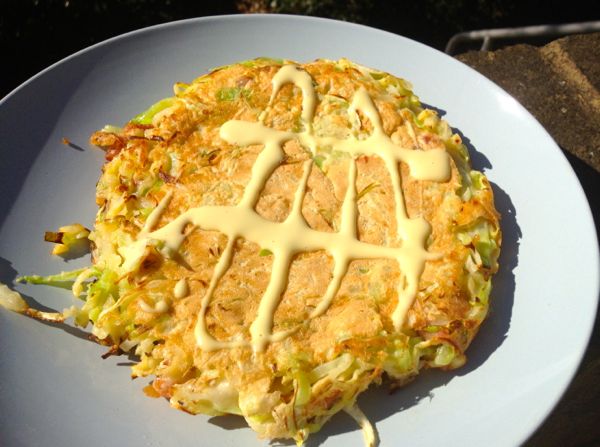
I started by baking the biscuits. Except I didn’t have any wholemeal flour, just some leftover buckwheat flour from the galette in Recipes from Brixton Village. Then I realised the rosewater for the marshmallows was three years out of date and smelt like a Woolworths bath and body gift set. It was time to use the random bottle of Polish raspberry syrup I’d impulse purchased a few weeks ago to see if I could add flavour and colour that way.

Raspberry and rose go beautifully so I still needed that rose petal jam: the rose petal jam that I forgot I’d eaten earlier this year and of course couldn’t be found without some time travel. Luckily I had some emergency raspberry jam on the shelf and it would look like it was intentional.

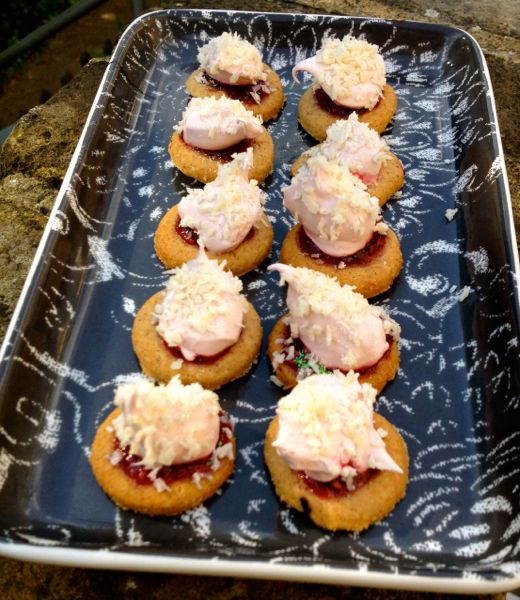
Massive amounts of improvisation later, I was ready to start assembling the teacakes. I spread the jam on the biscuits, splodged on the marshmallow and realised that on a very warm day the jam made it all so slippy I would never be able to coat them with chocolate without disaster. I was just about to give up on the whole endeavour when I realised that with a sprinkle of desiccated coconut I had accidentally created a homemade Mikado and saved the day…

Homemade Mini Mikado Biscuits (adapted from the Little Loaf)

Makes approx 60 bite sized biccies

  • 100g buckwheat or spelt flour
  • 50g rice or plain flour
  • 1 teaspoon baking powder
  • 50g sugar
  • 50g cold butter
  • 30ml buttermilk
  • 1 large egg white
  • 50g sugar
  • 2 tablespoons golden syrup
  • 4 tablespoons raspberry syrup or 75ml raspberry juice and 75g sugar
  • 4 tablespoons raspberry jam (seedless is best)
  • 2 tablespoons desiccated coconut

Start by making the biscuits. Sift the two flours into a large bowl and add the baking powder and sugar. Stir it all well together. Rub the cold butter into it all until it forms what looks like fine breadcrumbs. Add the buttermilk a teaspoon at a time. The dough will come together without being sticky.

Using the palms of your hands, form it into a loose ball and squash it flat into some clingfilm. Wrap tightly and chill overnight or for at least 6 hours.

Heat the oven to 170℃ and roll the biscuit dough out on a floured surface until it is about 1cm thick. Cut out little bite sized biscuits out with the top of a small jar or champagne flute. Lay on a tray lined with greaseproof paper and bake for 12 minutes. I don’t like my biscuits too crisp for this kind of thing myself.

Allow the biscuits to cool while you make the marshmallow. This is the kind of marshmallow you get in big pots called Marshmallow Fluff and for me it never sets to make the solid kind you toast, but is perfect for this kind of thing.

Set a large bowl over a pan of boiling water and melt the sugar and golden syrup together. Using an electric whisk, beat the egg white into it all and keep beating it all over the heat for 6 minutes. Add in the raspberry syrup. I used bottle stuff but make a quick version with the raspberry juice from squashed berries and sugar boiled together to make a thick syrup if you don’t have a crazy Polish drinks aisle near you. Beat it all together for another 2 minutes and remove from the heat to cool.

Put the cooled marshmallow into a piping bag. Do check to see if you have actually have a piping bag first unlike me who had to do the freezer bag trick instead. Spread a tiny blob of raspberry jam on each biscuit and pipe a puff of marshmallow on top. Yours will look prettier than mine I promise. Sprinkle the marshmallow with a scant amount of coconut and if you’re trying to hide the badly piped nipple-like marshmallow you’ve just done, add some edible glitter too.

Leave the biscuits to set for at least two hours before eating and then line them up on a plate to make what looks like one enormous Mikado and inhale them one after the other. Wearing a headscarf and housecoat is of course optional for most people but basically how I always dress when I’m cooking since you can only take the girl out of Belfast….

PS: I’m now on Instagram. Come and say hello!


Recipes from Brixton Village book launch

_NTI8538I’ve been a bit quiet recently because Recipes from Brixton Village launched last Thursday May 22nd and everything has been full on in that time. The book has been incredibly well received and at the time of writing is No. 1 on Amazon in their Restaurant Cookbook category! Thank you to everyone who has bought it, tweeted about it, told their friends about it and supported me with it. I couldn’t have done it without you all and of course the traders of Brixton Village. They have been absolutely fantastic and their enthusiasm about the book is infectious. We had a fantastic launch party on May 22nd at Studio 73 in the Village and the book sold like hot cakes, going even faster than the codfish fritters from Fish Wings and Tings, black olive doughnuts from Casa Sibilla and daikon and chilli dip from Okan did! We did justice to a keg of Brixton Brewery American Pale Ale,  some gluten-free Celia lager courtesy of Vozars and some of Brian’s home-made ginger beer…and spilled out into 1st Avenue dwarfing the Honest Burger queue for once.

Many thanks to Adrian at Studio 73 for allowing us to take over his shop and for hosting our illustrator Kaylene Alder’s exhibition. If you missed it you can still buy prints from the book from her website. And massive thanks to all the traders who supplied food and drinks too. _NTI8533 I’m delighted to share some of the photos from the evening with you if you weren’t able to make it. Sadly we don’t have any photos of the launch event with Herne Hill Books on May 25th as I was too busy selling books, chatting to Jay Rayner and encouraging people to try the excellent cupcakes from Sponge and Cream we celebrated it all with. If you are in Brixton this weekend, you can find Kaylene and me at the Big Lunch in Brixton Village at the Coldharbour Lane entrance from 11am-4pm. Kaylene is setting up an art trail for the kids and I’m running a small quiz to see how well you’ve all read the book!There’s also the charity lunch to raise money for Brixton Soup Kitchen. I’ll be selling and signing books as well along with the Brixton Blog team. And then on Monday night, I’m fighting any nerves about public speaking to read at the Brixton Book Jam at the Hootenanny on Effra Road. I should be making my author’s debut about 8.30pm so come along for a beer and some book chat. I might be selling books but if previous events are anything to go by, we’ll have sold out on Sunday! I’ll hopefully be popping up in Grazia Daily this week and we’re plotting all kinds of exciting events over the summer, including a little something at Lambeth Country Show. It’s quite the whirlwind of events but it’s been fantastic meeting people and just talking Brixton non stop! Definitely my dream job.

Don’t forget you can still buy books with free UK P&P direct from the Kitchen Press website or for international shipping at Amazon. Don’t forget to leave a review there to tell us how much you enjoyed the book or the recipes you cooked! Signed copies can be ordered from the Brixton Blog shop too. And if you come down to Brixton Village this weekend, you can buy the book direct from the traders and chat to them about their input. It’s also in stock at 20 Storey in Market Row along with a selection of other Brixton authors’ books and the famous I ♥︎ Brixton mugs. We really do have everything you could ever want in Brixton! _NTI8725

Pineapple Creams

pineapple cream I am obsessed with Northern Irish traybakes and home baking. I’m obviously having some kind of childhood regression, homesickness or strong desire to bring such delicacies to a wider primarily English audience.  Basically it makes sad that there are people have never eaten a fifteen or a top hat until now.

However having introduced several friends and readers to these entry level traybakes and got them hooked on the sugary delights of Norn Irish cuisine, I’ve been leafing through some prized local cookbooks to look for more niche items to feed to them.

Often these books are collected by a local church, parish or community organisation like the WI and while it’s tempting to giggle at the old fashioned recipes involving tinned fruit juice or glace cherries, these pamphlets and books have grown ever more fascinating to me as I’ve been working on Recipes from Brixton Village. Both capture a certain place and community in its time and introduce you to people’s lives through food, conversation and friendliness.

Books like this are a snaphot in time, a glance at history, fashions and people’s celebrations. They tell you as much as family albums and concentrate on home cooking rather than restaurant trends. They welcome you into their community and wider family and they appeal me to much more than the TV tie in cookbooks of recent years, leaving you feeling like you know something about the person who made the food as well as the dish itself.

I think people will enjoy dipping into Recipes from Brixton Village and feeling like they are getting to know the traders through the recipes and Kaylene Alder’s illustrations as much as I enjoy flipping through The Belfast Cook Book by Margaret Bates and seeing the environment my extended family were raised and lived in. I’ve learned things about my Protestant background in Belfast and mid Ulster from the church and WI books I’ve collected recently that I never noticed as a child (mainly that the traybake is a distinctly Prod way of eating…) Food is a very effective way to communicate no matter where you come from.

A recipe that just leapt out at me on this traybake inspired cookbook meandering was the now somewhat unfashionable pineapple cream. A small pastry tart case filled with crushed pineapple and whipped cream before being topped with pineapple water icing, these were a real favourite of me and my granny when I was wee. Trips into Lurgan town centre on market day weren’t complete without two of these in their little foil cases from one of the fantastic (and sorely missed) home bakeries every Northern Irish town centre had in those days.

Shelves at places like O’Hara’s, McErleans, Jeffers or Kennedy’s groaned with baps, farls, pan loaves,  gravy rings and sweet buns, biscuits and tarts. You couldn’t miss the pineapple creams with their vivid yellow toppings and we brought two home in a white paper bag to be eaten with a cuppa at the kitchen table. Strangely I don’t remember eating them with anyone’s else except her and I’ve certainly never heard of anyone making them at home, so it seemed time to try both.

Pineapple Creams (makes one 9″ tart or 12 small tarts)

  • 400g shortcrust pastry (not sweetened)
  • 2 x 425g cans pineapple chunks or crushed pineapple, juiced reserved
  • 400ml double cream
  • 400g icing sugar
  • 100ml boiling pineapple juice
  • pinch of yellow food powder or liquid colouring

I have to admit that I used shopbought pastry for this pineapple cream tart because my homemade stuff shrinks like wool on a boil wash and while I’m trying to work out what I’m doing wrong, I rolled out some commercial shortcrust instead. If you are more pastry proficient than me, this Dan Lepard recipe for pastry is a good basis.

Line a 9″ tart tin or a 12 whole small tart or bun tray and chill the pastry for about 30 minutes before blind baking for 25 minutes on 200°C. Remove the lining and baking beans after this and bake naked for another 5-7 minutes to give a golden finish. Allow the pastry to cool completely.

Drain the pineapple chunks and reserve the juice. These pineapple creams always used crushed pineapple with its soft almost sticky texture but this is much harder to get these days than it used to be. Del Monte sell it or you can simply crush your chunks with a potato masher. Drain off any excess juice after this and layer the pineapple into the tart tin.

Whip the cream and spread it over the pineapple evenly. Smooth the top down as much as possible with a spatula or a palette knife.

Pour the reserved pineapple juice into a saucepan and bring to the boil, adding the food colouring now if using the liquid version. Tip the icing sugar into a large bowl and add the pinch of yellow food powder if using. Pour the hot pineapple juice into a measuring jug and add about 25mls at a time, whisking well. 100ml will give you a loose but not pourable texture, but you might want a drop or two more if it is too stiff to spread. It should be a soft yellow colour rather than looking like the background of a smiley face.

Use a spoon to pour the icing over the cream. It should be thick enough to obscure the cream completely. Allow the icing to set for at least 1 hour before serving. The pineapple will begin to leech its juice after a few hours and the pastry will become sticky and a little difficult to cut in a large tart. No one will notice when they are eating it but don’t make it too far in advance. Serve with tea and a certain amount of nostalgia.

pineapple_cream_in_bakery-01

PS: Recipes from Brixton Village is available from May 22nd. Free P&P at the Kitchen Press website on orders!

Wild Garlic Skirlie

skirlieFollowing on from the fried porridge a few weeks ago, I have a bag of beautiful Flahavans oats in the house and an even bigger urge to eat oats than usual so I’ve been dying to try out a skirlie recipe for a while. Getting given a bag of wild garlic from a foraging friend the other week meant the time had come for a simple filling post Easter dinner.

Skirlie is a Scottish dish where oats are toasted in a hot pan before having water or stock added to plump them up and turn them into a chewy almost risotto like dish. Wholesome and incredibly filling, it’s a great way to use up odds and ends but without the constant stirring of a risotto.

A delicious dish, it isn’t much of a looker if I’m honest and it needs something green and gorgeous to lift it and make it more appetising. I usually wilt some spinach into it but wild garlic seemed perfect as it’s still just in season and adds tonnes of flavour. You could use any green leafy veg such as shredded kale, cabbage or beetroot tops.

Like most dishes a little bacon scattered through it is excellent but if you have some leftover haggis then you are in for a treat. It melts into the oats, adds a peppery kick and lends it all a stunning smooth creaminess that takes peasant ingredients and turns them into a dinner that feels extremely luxurious indeed.

Wild Garlic Skirlie (serves 2)

  • 25g butter, lard or bacon fat
  • 1 large leek
  • 1 small onion
  • 200g porridge oats
  • 400ml water
  • 100g haggis (optional)
  • 200g wild garlic

Melt the fat in a cast iron frying pan or skillet and when it bubbles gently, add the leek and onion and sweat it all down over a low heat for about 10-12 minutes. You could add a little fresh thyme here if you had any.

Once the alliums are sweated down and starting to reduce in size, add the oats in and stir well to coat them with the fat and toast them. Stirring continually, cook them for about 3-4 minutes until they soak up the fat and begin to smell toasty and golden.

Splash in a little of the water at a time, allowing it to soak into the oats each time. Stop and allow it to cook out if the oats start to look sticky. When you have about 50ml left, crumble the haggis into the pan as well. Add the remaining water and stir it all through. Allow to cook for 2-3 minutes more.

Wash the wild garlic well and put it in the pan with the skirlie. Put a lid on it if you have it and allow it all to wilt down for a few minutes. Serve the skirlie immediately in bowls and eat. Peppery enough from the haggis it needs no more seasoning. Enjoy and marvel at how uncannily filling and simple skirlie is.


St Patrick’s Day Okonomiyaki

okonomiyakiI have no idea what the adjective for Irish-Japanese fusion food is, but we need one. Both Ireland and Japan love a bit of cabbage and seaweed (and whiskey). Their cuisines have more in common than you’d think.

This idea came from Mister North who having seen the design for Recipes from Brixton Village on mentions the recipes he is most excited by as he reads. Okonomiyaki is a Japanese pancake made primarily from cabbage, but the number of spring onions (or more accurately scallions) in it made him think it overlapped with the Northern Irish delicacy of champ.

Since okonomiyaki means ‘as you like it’ I wondered if I could make a champ based version for St Patrick’s Day. I have grown to love okonomiyaki after Motoko Priestman opened Okan in Brixton Village, dishing up a variety of okonomiyaki in the Osaka style. My favourite is the mochi and cheese, but this is a little like choosing your favourite pet or child as they are all fabulous in their own way.

There are few more filling and healthy lunches than an okonomiyaki making it perfect for fortifying one’s self if you’ve had a few swallies the night before. I’ve gone stereotypically Irish here with bacon, cabbage and scallions. Annoyingly I was seaweed-less but some nori or dulse on top would have been perfect. I also varied from the usual topping of mayonnaise to use a creamy buttermilk dressing and omitted the typical okonomiyaki or ‘burnt sauce’ that tastes like ketchup combined with HP sauce.

St Patrick’s Day Okonomiyaki (adapted from Recipes from Brixton Village)

Serves 1

  • 50g pancetta or bacon cubes
  • 150g sweetheart cabbage, shredded finely
  • 2 scallions, chopped
  • 1 egg, beaten
  • 50g potato, grated
  • 50g plain flour
  • pinch sea salt
  • pinch brown sugar
  • 1 teaspoon baking powder
  • 50-75ml water
  • 1 egg
  • 1 tablespoon oil
  • 1 tablespoon buttermilk or yoghurt
  • 1 teaspoon mayonnaise
  • salt and pepper
  • seaweed flakes to serve

Okonomiyaki usually has toppings like thinly sliced squid, belly pork, prawns or cheese which are cooked as the pancake itself cooks, but because I only had thick cubes of bacon, I’ve cooked them first as they might still have been raw otherwise. Pan fry until crisp round the edges.

Shred the cabbage in very thin slices and then break it up into individual shreds with your hands into a large bowl. Add the cooked bacon and any fat from the pan. Thinly slice the scallions and add in. Beat the egg into it all. Set aside.

Take a skillet or heavy pan and heat on a high heat for about 3-4 minutes while you make the batter. Don’t add the oil at this point.

Prepare your batter by grating the potato in a bowl and adding the flour, sugar, salt and baking powder. Crack the egg into it and beat it in. Add enough of the water to make the whole thing a soft and pourable batter. Stir quickly but without overmixing. Pour 3/4s of the batter into the cabbage and bacon and mix lightly. Set the rest of the batter aside.

Add the oil in the pan and turn it down to a medium-low heat. Put the cabbage batter into the pan, smoothing it out from a heap to a thick pancake. Don’t push it right down to knock the air out. Cook the okonomiyaki for about 3 minutes.

Pour the remaining batter on top of it all. This would usually help seal the toppings into the okonomiyaki. Carefully flip the okonomiyaki over and cook on the other side for about 2-3 minutes. The base of the okonomiyaki will be quite dark from the hot pan but you want the top a bit paler.

Serve on a plate, paler side up and drizzle with the buttermilk dressing. Sprinkle with the seaweed flakes and a few spare scallion slices if you have them. Eat immediately and experience the perfect cross between a pancake, boxty and a potato farl. You may fancy a wee stout on the side. I had good strong tea instead.

Recipes from Brixton Village - front cover

Recipes from Brixton Village will be published on May 22nd 2014 from independent bookshops and the Kitchen Press website. It can be pre-ordered now for delivery as soon as it’s published.