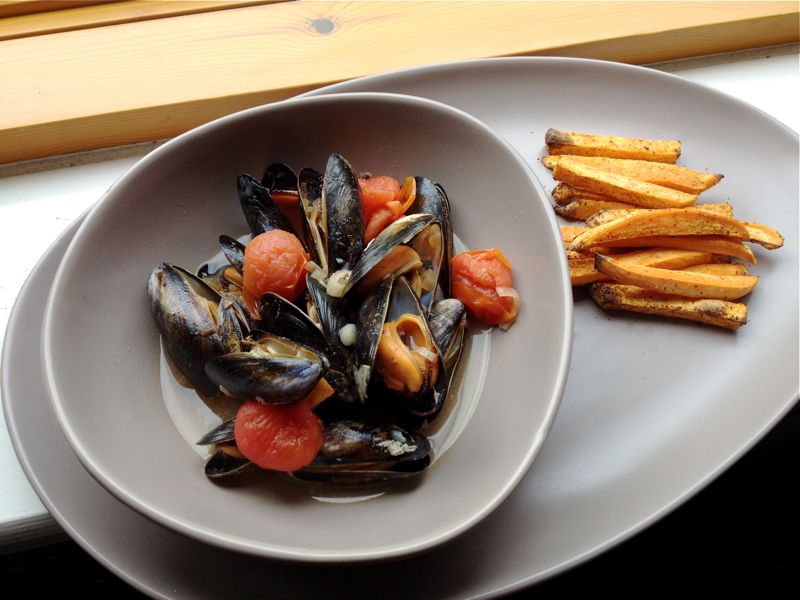
West African Inspired Mussels and Chips…


West African inspired mussels and chips

Much and all as I love summer, the months without an ‘R’ in curb my ability to eat shellfish as much as I’d like. So thank goodness for the humble mussel which can be eaten all year round. I love them in the summer as a light simple supper that doesn’t need much standing over a hot stove (normally because of the high temperature outside, but this year so it doesn’t cut into my watching TV under a blanket time…)

The French style is most common with mussels and although I love it, I wanted something a bit fresher and punchier.  Some fat scarlet tomatoes from O Talho caught my eye on the way back from Dagon’s and I’d just picked up some picture perfect red chillis from the Wing Tai Asian Supermarket. But as well as the warmth from the capsicums, I wanted some tingle and my mind went to the pod of alligator pepper a friend had gifted me after we shopped in the Village one Saturday.

Alligator pepper pod

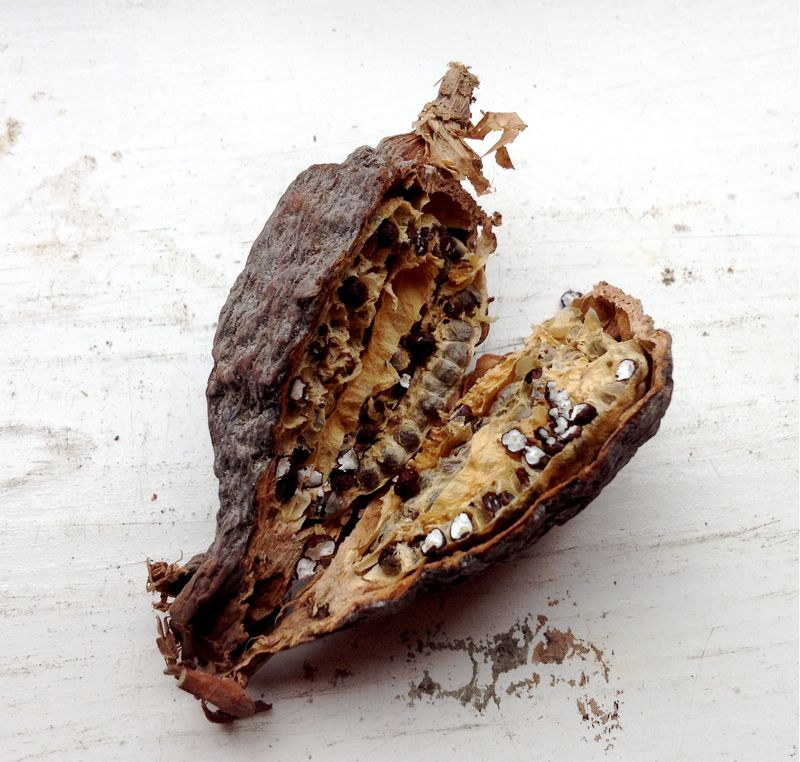
Highly prized in West Africa, especially Nigeria where the Yoruba incorporate it into naming ceremonies for babies, this pepper comes in a dry pod that looks like an alligator’s back and has a warm bite of pepper mixed with a slight hint of cardamom. I’ve mainly seen recipes for it involving fish and tomatoes so I knew it was likely to work with my mussels. I have no idea how authentic this might be though…

West African Inspired Mussels and Chips: serves 2 comfortably

  • 1kg bag mussels
  • 1/2 pod alligator pepper
  • 2 banana shallots or small onion
  • two handfuls of cherry tomatoes
  • 1 red chilli or 1 tsp hot sauce
  • 150ml water
  • 2 tsp oil
  • 4 sweet potatoes

First clean your mussels well. Pull the beards from them and discard any that are already open and that don’t close when tapped or that are broken. Leave them to soak in cold water to clean out any grit while you turn your attention elsewhere.

Heat the oven to 200℃ and then peel your sweet potatoes. I used orange fleshed ones from the supermarket. Cut them into chips, making sure that they are all roughly the same size and thickness so they cook evenly. Toss in a light coating of oil and then cook. I used a mesh tray like this which cuts the cooking time and washing up, but you are using an oven tray, they’ll take about 25 minutes.

About ten minutes before the chips are ready, finely dice your shallot and cook in a small amount of oil on a moderate heat until softened but not coloured. If using the chilli, cut finely and add to the shallot. Keep the seeds in if you want more heat. Then take the alligator pepper pod and scoop the seeds out and grind them in a pestle and mortar before adding to the shallot and chilli to cook out slightly. Cut your tomatoes in half and add to the pan. You don’t need any extra seasoning.

When the tomatoes start to collapse slightly round the edges, add in the cleaned wet mussels to the pan. Pour the water on top and put the lid on and cook for about 3-4 minutes or until the mussels have opened and the tomatoes are thickening the juices. Take off the heat and leave the lid on while you dish up the sweet potato fries on a separate plate. Then serve the steaming hot mussels in bowls with a good amount of the tomato rich liquor and then dig in.

The best way to eat mussels is to use the empty shell to pick the meat out of the next. Discard any mussels that haven’t opened and enjoy each flavoursome mouthful as the warmth of the chilli and alligator pepper builds a tingle on your lips and the pile of shells grows. Best eaten with a ice cold beer, a roll of kitchen paper and some non judgemental friends to hand!


This post first appeared over at Brixton Blog celebrating all our lovely local shops.


Deep Fried Okra

Recently in my travels round Brixton, I keep coming across Americans who now live here. It’s testament to what a great area Brixton is that many of them say it’s the best neighbourhood they’ve ever lived in and my recipe here is partly inspired by them. But its mainly inspired by my determination not to shudder slightly whenever I see piles of okra on the stalls in the market. I’ve only ever eaten it once when I was a child and was singularly unimpressed by its slimy texture and have avoided it ever since. But encouraged by African friends who consider it a kitchen staple and those Americans who all responded affirmatively when I mentioned it, I’ve decided to give you my melting pot take on it and like the good Belfast girl I am, fry it. I mean, what food doesn’t taste even better when fried?

I’m branching out a bit here and using cornmeal instead of a batter. I’ve only recently discovered this as a coating for things and can’t get enough of its crunchy crispness, preferably dipped in something spicy and delicious. A firey salsa made with the super sweet vine tomatoes that are perfectly in season right now, some smoked garlic and a burst of red onion would take this from side dish to star attraction at dinner, especially with an ice cold beer to accompany it…

Fried Okra:

  • about 200g of okra, cut into 1 inch chunks
  • 2 eggs, beaten
  • 200g yellow cornmeal (also called polenta if you’re looking for it)
  • 1/2 teaspoon chilli powder/cayenne pepper
  • 1 teaspoon paprika
  • seasoning as required.
  • vegetable oil for frying

Get your oil on to heat, making sure you only fill your pan a third full of oil so it can’t bubble over. You want it hot but not scorching.

When buying the okra, make sure the pods are nice and furry and not split at all. Wash them and dry them well. Cut each pod in roughly three pieces. Then dip the pieces into the beaten egg before putting them into the cornmeal and making sure they are well coated. Don’t hang about, do both dippings quickly and put them into the oil immediately to cook. Give them about 2-3 minutes each side or until the okra and the coating both go golden.

Serve immediately, preferably dipped into a little hot sauce and salt. We had them on the side of some curry goat, but these fried okra will go with anything and make a great gluten free vegetarian dish. If like me, you were nervous about the slime potential, don’t be. Fried up like this, it’s a good balance between soft and crunchy and I surprised myself by having seconds, as did my American dining companion…

Okra pods

*An edited version of this post originally appeared at Brixton Blog.

Pastrami

There is a long weekend coming up and I have an excellent suggestion as to what you could do with it. Why not have a go at making home made pastrami? It’s not quick, but it’s also not difficult in the slightest. And if the weather is good over the Jubilee, it’s an excuse to get the barbecue out. Tempted yet?

Pastrami is beef brisket, brined and cured, then rubbed with spices and smoked until cooked. It’s also known as the finest sandwich filling around and something you always want more of so having a great big hunk of it in the fridge as cold cuts when you’re off work is just ideal. I’d actually never cooked with brisket before, but Mister North’s superlative spiced beef at Christmas had piqued my interest and I was just waiting to get my hands on one. And thanks to Becs over at Lay The Table alerting me to the presence of Farmison and their grass fed, higher welfare standard meat by mail order, I ordered a 2kg beauty on a Tuesday evening and had it ready for its brine bath by Thursday tea time which impressed me greatly and I’ll certainly be using them again for things my butcher can’t get me easily.

Brining meat is very easy. You simply prepare a solution of water, spices and salt and immerse the meat for the required time. This is also a cure thanks to the presence of saltpetre and means the meat doesn’t spoil, but retains a lovely rosy hue instead of looking leathery like some cooked beef does. Although the meat will be preserved by the process, you still need to be cautious with hygiene and make sure everything you use is nice and clean. It’s also worth preparing everything in advance rather than weighing spices at each step or you’ll lose track and end up accidentally doing too much of one thing.

Pastrami

  • brisket (I used a 2kg piece)
  • 200g sea salt
  • 100g dark brown sugar
  • 2 litres water ( I boiled it and cooled it)
  • 6 cloves of raw garlic
  • few stalks of thyme
  • 2 teaspoons of saltpetre (I had mine from the bacon)
  • 1 tsp whole cloves
  • 1 tsp whole peppercorns
  • 1 tsp whole coriander seeds
  • 1 tsp shichimi togarashi (or chilli flakes)
  • 2 tsp allspice berries
  • 2 cinnamon sticks
  • 1 tsp mustard seeds
  • 1 tsp fennel seeds
  • 1 tsp ground ginger
  • 1 tsp ground mace
  • 1 tsp mustard powder
  • 4 bay leaves (ie: I just used everything in the cupboard, bar cumin)

If your brisket comes in one of those meat hairnets, remove that now, but keep the string around it to keep the brisket shaped and rolled. Rub a handful of the salt over the meat while you dissolve the rest of the salt, the sugar and the saltpetre in the hot water. Give the spices a bash to release their oils and flavours and add to the water. Bruise the garlic cloves to release the flavours and put them and the thyme into a deep tupperware and put the meat in and pour the brine you’ve just made over the meat. Seal it up and leave it in the fridge for up to five days, but a minimum of two.

The meat will still have a pinkish tinge when you take it out of the brine so don’t worry, it’s quite safe to cook. The meat needs to be smoked to give that proper pastrami feel so there are two ways you can do it. If the weather is nice, you can use the barbecue or you can do it in the oven, but either way you’ll need wood chips to impart the  smokiness that lifts this from just being beef. Don’t forget to rub a crust of ground coriander seeds and cracked black pepper over the top of the meat first.

I started mine off on the barbecue using the indirect method where the charcoal is on either side of the grill and the meat is in the middle in the coolest spot so that it cooks without getting that charred exterior that direct cooking gives. I added pecan wood chips that I had soaked first and I got a fairly good smoke on but the charcoal went out about two hours in and since I don’t have a meat thermometer, I couldn’t tell if the meat was cooked so I popped in the oven to finish off. I put the rest of the wood chips in a dispable foil tray and put the meat above them on a trivet, then covered it all with foil and slow cooked it for 90 minutes at 150℃. The moisture from the wood chips steams the meat so it doesn’t dry out, but keep an eye and make sure they don’t lose moisture themselves. You might need to top up.

Once you’ve let the meat cool down then you can congratulate yourself. You’ve just made  pastrami from scratch! It’s as simple as that. Now serve it either slightly warmed (pop it back in the oven to heat gently) or at room temperature for a stunning picnic lunch. I made mini pretzel rolls and bagels from Dan Lepard’s excellent recipe and heaped them high with gherkins and mustard on the side and it all seemed to go down marvellously, fortifying us well to sit through four hours of Eurovision, but leaving me with a goodly amount of leftovers for cold cuts in the warm weather. Don’t delay and you could be seeing in the oh so British Jubilee next week with some very American pastrami!

Saltfish and Parsnip Croquettes

When I was wee, you saw croquettes on the menu quite often, usually involved leftover potato and tinned fish in luridly orange breadcrumbs and often oddly accompanied by chips for triple carbing. This rather British concoction has fallen out of favour, replaced by the rich bechamel filled croqueta of tapas bars as we become more cosmopolitan. I rather miss the old version and when I was picking up some saltfish in the market the other week, my mind went toward reinventing, and hopefully reviving them.

I love the firm texture of saltfish or salt cod and since discovering that it freezes well after soaking, often have some to hand since it is eternally versatile. I also often have leftover mash as I find it a kitchen staple. I just needed something else to lift the croquettes from their bland reputation and when rummaging in the fridge on a damp Bank Holiday and sincerely hoping I wouldn’t have to go outside, I stumbled across a parsnip and thought its spicy sweet flavour would go brilliantly with the fish. I suddenly had the perfect leftovers brunch!

Saltfish and Parsnip Croquettes (best as leftovers, slower to make from scratch)

  • 150g saltfish, soaked according to instructions. (I do a big batch and then freeze it for quick dishes)
  • 250g mashed potato (I use a ricer for super smooth mash)
  • 100g grated raw parsnip
  • 1 egg, beaten
  • 100g panko breadcrumbs
  • oil for frying

These are super simple and should take about 30 minutes to make including chilling. Peel and grate a large parsnip. Mix it into the mashed potato with your hands until well combined and then flake in the soaked saltfish, checking for any bones as you go. Season to taste (most of the salt will have soaked off the fish, but be cautious in case it hasn’t) and mix up well with your hands. Then take about a handful and roll into a ball, then out into a sausage shape. This amount should make six. Place on a slightly oiled plate and chill for minimum 20 minutes or until needed.

When you are ready for the croquettes, either heat a frying pan with olive oil for shallow frying. Crack the egg into a bowl and beat. Tip the panko breadcrumbs onto a plate. Then roll the croquette in egg and dip in the breadcrumbs and then into the hot pan. The panko crumbs which are made without a crust will become golden and crispy while the inside is hot and fluffy. Turn regularly giving each side about a minute. Drain onto kitchen paper. You could use a deep fat fryer if you prefer as this will do all sides at once. Serve with salad as a starter or with a poached egg on top as a main course. Chilli sauce is essential either way.

I like all the constituent parts of these so I expected to enjoy them. I was pleasantly surprised to adore them.  The breadcrumb coating was light and crispy and not at all greasy, giving way to a smooth filling crammed with firm flaky fish and peppered with still slightly crunchy parnsip that really came into its own, leaving behind its bland reputation completely. This was the best brunch I’ve had in a long time and I look forward to making them again and trying oven baking them as fishcakes. If you’ve ever wondered what to do with either saltfish or a parsnip, I can’t recommend these enough. If the croquettes of my childhood had been this flavoursome, they would never have fallen out of fashion!

*This post originally appeared over at Brixton Blog where those lovely Brixtonians let me have free run of their kitchen.

Brixton Marmalade

Walking through Brixton Market is a riot of fresh fruit and vegetables of all colours. Some are familiar, but sometimes your eye is caught by something you don’t recognise, which is exactly what happened when I saw green oranges on many of the stalls. Some questioning and Googling later, I realised these are Jamaican oranges and not just the colour is different. They are thinner skinned than the peeling sort like Jaffas we are used to in the UK with plenty of pith and pips and a bittersweet flavour. I knew immediately that they would make the most fabulous marmalade…

I was sure I didn’t really like marmalade after one too many single serve portions of Golden Shred in a B&B. Sickly sweet instead of tangy and tasty, the commercial version leaves a bad taste in my mouth. Determined to overcome this dislike, I decided to try making my own and see if I could be convinced. Not only was I won over in abundance, I’ve become slightly obsessed, making pots and pots of the stuff from every citrus I can get my hands on, entering the World Marmalade Awards and slathering it on doorsteps of Wild Caper sourdough like there’s no tomorrow. The homemade stuff tastes amazing and is incredibly cheap and easy to make. You’ll never look back.

To make 2 large or 4 small jars you’ll need:

  • 800g of Jamaican oranges (about 4 in total)
  • 1 lemon
  • 3 pints of water
  • 1 kilo of sugar
  • 2 tablespoons rum
  • jars, empty and well washed
  • muslin cloth (look in the baby section for these cheaply)
  • length of string
  • cellophane jam jar covers, wax covers & elastic bands
  • two saucers or a food thermometer

The marmalade is very easy, but it does take several stages and needs to left overnight. Don’t be daunted though!

Start by cutting the oranges in half and juicing them. You should get about half a pint from this amount of oranges. Reserve the juice in a jug. Keep any pips you came across and soak them in water. Then chop your orange shells. Pull the most fibrous flesh out and then cut the peels in chunks of your choosing. I like my marmalade quite thick cut for flavour and ease of prep, but it’s your choice.

Soak the peels overnight in about 2 pints of water until it turns orange and smells delightfully citrus scented. Bring it all to the boil and then simmer for up to hours or until the peel is soft and squishy, but not pulpy. Add in a bit more water if needs be.

Iron your muslin cloth (and cut it to be smaller if needs be) and gather the reserved pips in it like a purse, tying to the handle of the pot so it hangs down into the boiled peel mix. They contain extra pectin that helps set the marmalade. Turn the oven onto 160℃ and put the jars in, using a baking tray rather than trying to grab individual hot jars with oven gloves and feeling like you’re playing a game fit for particularly sadistic PTA fundraisers. Get your thermometer to the ready if you have one or put your saucers in the freezer if you don’t.

Add the reserved orange juice to the mix, pour in the sugar and the lemon juice and bring the pot back to the boil. This is the stage when you work your magic and turn the mix into marmalade by heating it to 104℃ exactly. The thermometer will tell you this with ease, but you can also tell by spooning a drop or two of the boiling liquid onto a cold saucer, leaving for a sec and testing it with your finger to see if it ‘wrinkles’ when pushed. If it does, you’ve reached 104℃ and if it doesn’t, keep trying with alternate chilled saucers til it does.

Take the pot off the heat immediately. Add the rum (or ginger if you prefer a teetotal kick) and stir well. Leave the marmalade to sit for a minute or two to stop the peel sinking in the jars and then carefully fill the jars you’ve just taken from the oven right to the brim. Both the jars and the marmalade are obviously devilishly hot so keep your wits about you and any small children and pets away. Cover with the wax circles from your little kit.

Allow the jars to cool just enough to handle, then wet the cellophane lids well with a clean washing up sponge and stretch tightly over the top of the jar and fix with the rubber bands. This is fiddlier than you’d think and there may be some sailor’s language to accompany the rum. Let the marmalade cool completely and set before digging in and sampling your handiwork.

You’ll be amazed. It’ll be punchy with citrus and a slight hint of smooth rum with each peel exploding into little chewy nuggets of deliciousness. You won’t be able to stop yourself having a second (or third) slice of marmalade smeared bread, but if you can bear to part with a jar of it, your boss will understand why you are late for work now breakfast has become the highlight of the day again!

Jamaican green orange

* This post originally appeared on Brixton Blog who kindly asked me to write a local recipe and is re-posted here due to popular demand.