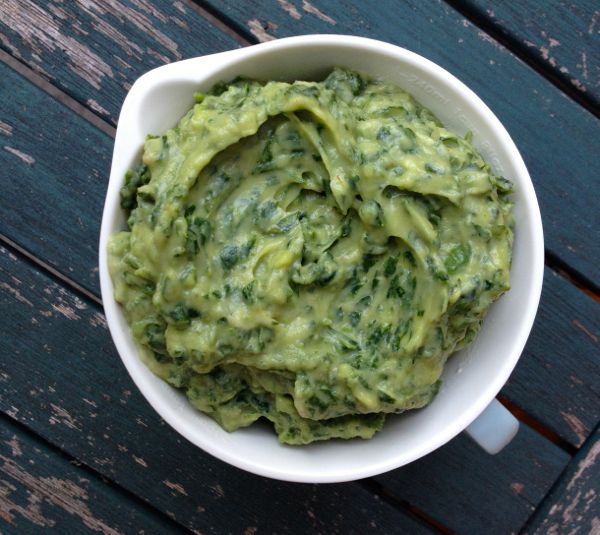
Green Goddess Dressing
Brixton market is fantastic all year round and the reason I am able to eat so well on a budget, but every so often, it exceeds even my expectations of it. This week it was with small dark skinned avocados for 25p each or 6 for a pound. (I hear places in West Norwood are doing 7 for a pound but that’s irritatingly odd numbered for me.)
I took my bulging bag of avos home and pondered what to do with them beyond simply splitting them in half, going old school by filling them with vinaigrette and eating them with a spoon. I vaguely remembered bookmarking Green Goddess dressing ages ago in preparation for a glut of avocado and it seemed like the moment to unearth it.
For those of whom who don’t know what Green Goddess dressing is (ie: all British people), it is an American salad dressing, particularly popular in the Seventies and absolutely packed with fresh herbs to give it the green of the name. While it has fallen out of favour generally, it’s popular amongst vegan food bloggers who use avocado to give creaminess instead of the lashings of mayo the original recipe featured.
It’s particularly good at this time of year when often you have a fresh herb fest in the garden as well as being more likely to eat salad. I’d love to tell you that I went out to the patio and cut my own home grown herbs and salad leaves to create this meal, but since I’ve killed all my plants except the thyme that went to live next door for its own safety, I’d be lying. I simply revelled in finally being able to use up those bouquet sized bunches of herbs in the market for once.
I made this version when I was cooking for a friend who is vegan so omitted the traditional anchovy using a little miso instead. You could also substitute with nutritional yeast.
Green Goddess Dressing (makes about 350ml)
- 2 scallions
- 1 clove garlic
- 100g fresh basil
- 100g fresh parsley
- 25g fresh thyme
- 25g fresh tarragon or oregano
- 1 anchovy fillet or 1 teaspoon miso paste
- 4 small avocados or 2 regular sized ones
- juice of two lemons or limes
- 1 teaspoon white wine vinegar
- 1/8 teaspoon Tabasco or similiar hot sauce
- 1/8 teaspoon ground cumin
- salt and pepper
- 50ml cold water (optional)
This dressing is easiest in a small blender but you could make it the the old fashioned way with some serious chopping.
Start by finely chopping or blitzing the scallions and garlic. Set into a large bowl and chop or blitz all the fresh herbs as much as possible. They should almost be a chunky paste. Add in the miso or anchovy and combine it all well to a further rough paste. Add to the scallion and garlic.
Cut the avocados in half and remove the stones. Puree or mash the avocado as smoothly as possible and stir into the chopped herb and scallion mixture. It will be slightly coarse in texture at this stage but combined.
Add the juice of the lemons or limes, the vinegar and the hot sauce. Mix well and stir in the cumin and the seasoning. The dressing should be thick, smooth and very creamy at this stage but if it’s too stiff for your liking, add the cold water to make it a little looser. I like mine thick enough to splodge with a spoon but add a bit more water if you want to be able to actually pour it onto a salad.
I served mine more like a dip with herbed courgette fritters swiped through it. It would also be fantastic with tortilla chips for a change to guacamole. It dresses salad beautifully and if you aren’t vegan, it’s excellent with chicken or fish. The high acid content in the dressing means it will keep covered in the fridge for up to three days without discolouring.
Hopefully this dressing will have a revival as it’s so delicious. You can adapt the fresh herbs depending what you have. I wouldn’t use rosemary but chives, majoram, sorrel or dill would all work well too. It’s just further confirmation that Americans really are the people to ask about salad dressings and dips because they do them so well.