Tag Archive for: simple

Cashew Nut Blondies

cashew blondiesAs I might have mentioned, I’ve been quite busy recently which has lead to the slightly bizarre scenario of being a food writer without the time to cook anything. What I needed was something low maintenance, very easy and with tonnes of impact for very little effort.

Oddly enough I found the answer to this quest in a disappointing jar of cashew butter. Since I’ve been lusting after some Keen nut butters for ages but unable to get them easily in South London, I impulse purchased a jar of the new Sun-Pat cashew butter instead.

I should have held out for the good stuff because this cashew and peanut blend was awful. Flavourless, limp and claggy, I couldn’t even eat the slice of toast I’d put it on as midnight snack. Staring blankly at a whole jar of the stuff, I took to Twitter to vent and some bright spark suggesting baking with it to rescue it.

I originally thought I’d make cookies like these but then I happened to be perusing one of my favourite sites Post Punk Kitchen and saw a recipe for peanut butter blondies and knew I had my answer. I love Isa’s recipes even if I tend to de-veganise them as I have here and adapted them in other ways.

Spiced Cashew Nut Blondies (makes about 12 medium size blondies)

  •  150g cashew nuts, roughly chopped
  • 2 tablespoons water
  • 2 tablespoons sugar
  • 1 teaspoon cinnamon
  • 1/2 teaspoon ground ginger
  • 1/2 teaspoon allspice
  • 1/4 teaspoon mace
  • 175g cashew nut butter or peanut butter
  • 50ml vegetable oil
  • 175g brown sugar
  • 50ml milk (non dairy milk works well too)
  • 2 teaspoons vanilla extract
  • 250g plain flour (use a gluten free one if needed)
  • 1/2 teaspoon sea salt
  • 1/2 teaspoon baking powder

Begin by taking some roasted salted cashew nuts and chopping them roughly so that each nut is in about thirds. You want a bit of bite. Melt the sugar and the water together in a small pan and add the spices. Stir it all well and allow to become a thick dark syrup. Toss the cashew nuts in the syrup and lay in a single layer on a baking tray. Roast for about 15 minutes at 200℃.

In a large bowl, mix the cashew nut butter and the oil together into a thick paste. Beat the sugar into it all. Add the milk and the vanilla. It will be quite runny. Sift the flour, salt and baking powder into the nut and sugar mix.

Stir it all well. It will combine easily into a ball that comes away from the edges of the bowl cleanly. Line a 9 inch square tin with baking liner or greaseproof paper. Tip the roasted spiced cashews into the dough and carefully mix them through lightly. Spoon the dough into the tin and flatten it out with the back of a fork.

Turn the oven down to 175℃. Bake the blondies for about 20-22 minutes or until the edges are golden brown. The centre should still be soft. Allow the blondies to cool completely in the tin and then cut into 12 squares.

These kept for almost a week in an airtight container and were a fantastic quick snack when I didn’t have time to do more than just grab something with a cuppa. The cashew nut butter wasn’t completely rescued by this as the taste was still a bit thin, but the texture was fantastic and I’d make them again with a decent peanut or cashew butter anytime. I might even re-veganise them too…

Adventures in sourdough: pancakes and grissini

Mixed spring sourdough grissini

One of the things which seems to mark out people who care about their food is a love of proper bread. In some respects I came round to this rather late. Although we grew up enjoying bread from wee bakeries in Northern Ireland, with lovely batch loaves, bloomers, wheaten bread and more; we also ate a lot of cheap sliced loaves at home. I used to be a demon for toast, and sliced pan loaves were the only option to sate my cravings as a growing teenager.

Throughout student life cheap sliced loaves were a staple. After graduating I shared a house with a mate who never bought a loaf of pre-sliced bread. His stance wasn’t dogmatic – no deeply ingrained opposition to the Chorleywood process – he just liked half-decent bread, and the pleasure of being able to cut your own slice, to whatever thickness you desired. Thanks to him, I kicked the habit of rectangular loafs wrapped in plastic like Laura Palmer. Since then I’ve made an effort to try and buy decent bread (Barbakan in south Manchester was a particular inspiration), and I tempered my toast habit a bit…

Unlike Miss South I’ve never been particularly drawn to baking – a few experiments in the past led to some reasonably unimpressive loaves – and so have stuck to flatbreads, pizzas, coca bread and of course those Norn Irish staples we both grew up with. I’ve always been impressed and daunted in equal measure by tales of friends growing their own sourdough starters, but never made the leap to doing it myself.

However our mum gave me a bit of her starter earlier this year (a mother from my mother seems appropriate) and so I’ve been giving this sourdough malarky a go. I work at home, so I’ve been able to accommodate the routines of this relatively undemanding pet: feeding, stirring, growing, nurturing. Loaves have turned out pretty well, and I can relate to the satisfaction one often hears described which comes with slowly proving a loaf with rewarding, complex flavours. However there are lots of folk out there who bake sourdough bread much better than I do… so this is about other things made with sourdough instead.

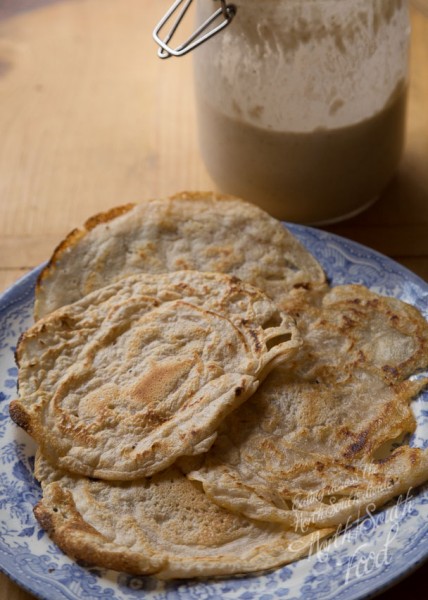
Sandor Katz’s monumental ‘The Art of Fermentation’ was a recent welcome birthday present, and as I leafed through the inspiring recipes and writing I was immediately drawn to his suggesting of using up excess sourdough starter for savoury pancakes. It’s dead simple: to help stimulate your starter to grow, you need to chuck out the majority of the flour and water mix so you can feed the remainder with new supplies. Most sources advocate using it for baking, or chucking it away, but the waste-not, want-not approach which Katz outlines is great.


sourdough pancake and starter

They’ve become a firm favourite in the last few weeks, providing an easy and welcome vehicle to use up a bunch of fresh and not-quite-so-fresh things from the fridge. I love the slightly sour tang from the starter; it’s like an quick and dirty hybrid of injera and a Staffordshire oatcake, and they’re great for a quick lunch.

sourdough_extras-03

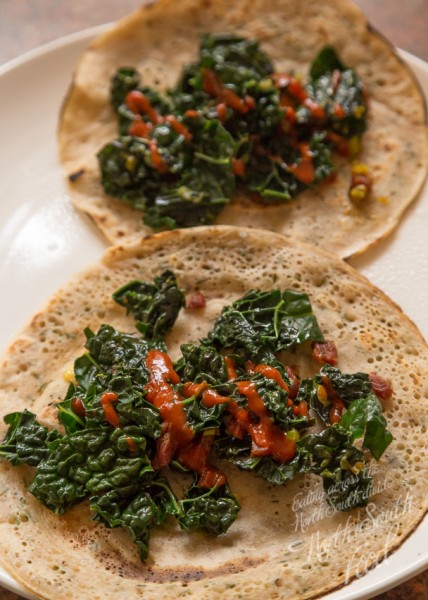
Just pour out some of the sourdough ‘batter’ into a hot pan, and do like you would with traditional pancakes. Then fill, and wolf them down. Below are a couple of recent lunchtime five-minute wonders: blanched cavolo nero, diced salami and a squirt of sriracha in pancakes flecked with chives; and home-made slaw, salami and leaves. The contents are dictated only by your taste and what you have in. The only downside; roll ‘em like wraps and they disappear in no time.

sourdough_extras-04  sourdough_extras-02

Outside, our rosemary bush has been flowering over the last few weeks. I’ve always wanted to make the most of these delicate, beautiful lilac flowers but never settled on the right option. They wilt and fade when roasted with lamb; they’re a bit much for a salad… but then I thought I’d try and pair them with smoked roast garlic and sea salt.

bumblebee on rosemary flowers

That, plus it being the tail end of wild garlic season in the Pennines, meant a making a brace of big umami-laced flavoured breadsticks. Which, oddly, don’t seem to last long in our house, especially when there’s a bottle open. Of the two, the rosemary flowers and smoked garlic was the standout for me. Well worth making…

Wild garlic, smoked garlic, rosemary flowers and sourdough mix

Spring sourdough grissini, two ways

(makes approx. 24 breadsticks)

  • 325g strong white flour
  • 150g sourdough leaven
  • 1 teaspoon salt
  • 220ml slight warm water
Rosemary flower, smoked roast garlic and sea salt 
  • 3-4 tablespoons of rosemary flowers (you could alternatively use dried ground rosemary leaves)
  • half a bulb of smoked garlic, roasted slowly for 40mins in an oven at approx. gas mark 4 / 180°C
  • a few tablespoons of sea salt to roll and coat the grissini in
Wild garlic, anchovy and black pepper
  • a fistful of wild garlic leaves, finely chopped
  • 6-8 anchovy fillets
  • fresh ground or crushed black pepper
  • olive oil

Roast the smoked garlic slowly. When done, remove from the oven and leave to cool. You should be able to squeeze out the delicious garlic purée from the cloves. Chop the wild garlic leaves finely, mixing with a splash of oil and chopped anchovies in a bowl to create a paste.

Mix the flour and leaven together in a bowl, then slowly add the water. Sprinkle the teaspoons-worth of salt in as you add the water. Mix roughly in the bowl, then leave for ten minutes. After ten minutes, divide into two equal portions, and work each separately. It should be slightly wet and sticky.

Mix the rosemary flowers into one of the portions in a bowl, then add the roasted garlic purée. Knead and mix until the ingredients look evenly distributed, and you can feel the dough changing in your hands. I slap it around briefly for a few minutes, then left it, before returning after a suitable length of time (preferably at least 4 hours). The mix will have risen slightly and proved well.

With the other, stir in the wild garlic mix. You may find you need to add extra flour as the water from the wild garlic leaves makes the dough more liquid. Mix as above until it’s uniformly green and has changed texture, then leave as above.

When the proving has completed, divide each in half, roll into a rough sausage shape, and then divide further into six equally-sized pieces. Roll these pieces, one by one, between your hand to make long breadstick shapes. Be careful they don’t snap… and don’t sweat it if they are uneven. They should look pleasingly rustic. Keep each dusted lightly in flour, and place on a dusted baking tray.

I sprinkled sea salt on a baking tray and rolled the rosemary and smoked garlic grissini in these, so the crystals stuck roughly to the dough.

Bake in batches for 12-15mins in a pre-heated oven at 220°C / Gas Mark 7. Check to see they’ve firmed up and taken some colour. They should be firm enough to break rather than tear. Leave to cool, then enjoy with a drink or two!

Pineapple Creams

pineapple cream I am obsessed with Northern Irish traybakes and home baking. I’m obviously having some kind of childhood regression, homesickness or strong desire to bring such delicacies to a wider primarily English audience.  Basically it makes sad that there are people have never eaten a fifteen or a top hat until now.

However having introduced several friends and readers to these entry level traybakes and got them hooked on the sugary delights of Norn Irish cuisine, I’ve been leafing through some prized local cookbooks to look for more niche items to feed to them.

Often these books are collected by a local church, parish or community organisation like the WI and while it’s tempting to giggle at the old fashioned recipes involving tinned fruit juice or glace cherries, these pamphlets and books have grown ever more fascinating to me as I’ve been working on Recipes from Brixton Village. Both capture a certain place and community in its time and introduce you to people’s lives through food, conversation and friendliness.

Books like this are a snaphot in time, a glance at history, fashions and people’s celebrations. They tell you as much as family albums and concentrate on home cooking rather than restaurant trends. They welcome you into their community and wider family and they appeal me to much more than the TV tie in cookbooks of recent years, leaving you feeling like you know something about the person who made the food as well as the dish itself.

I think people will enjoy dipping into Recipes from Brixton Village and feeling like they are getting to know the traders through the recipes and Kaylene Alder’s illustrations as much as I enjoy flipping through The Belfast Cook Book by Margaret Bates and seeing the environment my extended family were raised and lived in. I’ve learned things about my Protestant background in Belfast and mid Ulster from the church and WI books I’ve collected recently that I never noticed as a child (mainly that the traybake is a distinctly Prod way of eating…) Food is a very effective way to communicate no matter where you come from.

A recipe that just leapt out at me on this traybake inspired cookbook meandering was the now somewhat unfashionable pineapple cream. A small pastry tart case filled with crushed pineapple and whipped cream before being topped with pineapple water icing, these were a real favourite of me and my granny when I was wee. Trips into Lurgan town centre on market day weren’t complete without two of these in their little foil cases from one of the fantastic (and sorely missed) home bakeries every Northern Irish town centre had in those days.

Shelves at places like O’Hara’s, McErleans, Jeffers or Kennedy’s groaned with baps, farls, pan loaves,  gravy rings and sweet buns, biscuits and tarts. You couldn’t miss the pineapple creams with their vivid yellow toppings and we brought two home in a white paper bag to be eaten with a cuppa at the kitchen table. Strangely I don’t remember eating them with anyone’s else except her and I’ve certainly never heard of anyone making them at home, so it seemed time to try both.

Pineapple Creams (makes one 9″ tart or 12 small tarts)

  • 400g shortcrust pastry (not sweetened)
  • 2 x 425g cans pineapple chunks or crushed pineapple, juiced reserved
  • 400ml double cream
  • 400g icing sugar
  • 100ml boiling pineapple juice
  • pinch of yellow food powder or liquid colouring

I have to admit that I used shopbought pastry for this pineapple cream tart because my homemade stuff shrinks like wool on a boil wash and while I’m trying to work out what I’m doing wrong, I rolled out some commercial shortcrust instead. If you are more pastry proficient than me, this Dan Lepard recipe for pastry is a good basis.

Line a 9″ tart tin or a 12 whole small tart or bun tray and chill the pastry for about 30 minutes before blind baking for 25 minutes on 200°C. Remove the lining and baking beans after this and bake naked for another 5-7 minutes to give a golden finish. Allow the pastry to cool completely.

Drain the pineapple chunks and reserve the juice. These pineapple creams always used crushed pineapple with its soft almost sticky texture but this is much harder to get these days than it used to be. Del Monte sell it or you can simply crush your chunks with a potato masher. Drain off any excess juice after this and layer the pineapple into the tart tin.

Whip the cream and spread it over the pineapple evenly. Smooth the top down as much as possible with a spatula or a palette knife.

Pour the reserved pineapple juice into a saucepan and bring to the boil, adding the food colouring now if using the liquid version. Tip the icing sugar into a large bowl and add the pinch of yellow food powder if using. Pour the hot pineapple juice into a measuring jug and add about 25mls at a time, whisking well. 100ml will give you a loose but not pourable texture, but you might want a drop or two more if it is too stiff to spread. It should be a soft yellow colour rather than looking like the background of a smiley face.

Use a spoon to pour the icing over the cream. It should be thick enough to obscure the cream completely. Allow the icing to set for at least 1 hour before serving. The pineapple will begin to leech its juice after a few hours and the pastry will become sticky and a little difficult to cut in a large tart. No one will notice when they are eating it but don’t make it too far in advance. Serve with tea and a certain amount of nostalgia.

pineapple_cream_in_bakery-01

PS: Recipes from Brixton Village is available from May 22nd. Free P&P at the Kitchen Press website on orders!

Wild Garlic Skirlie

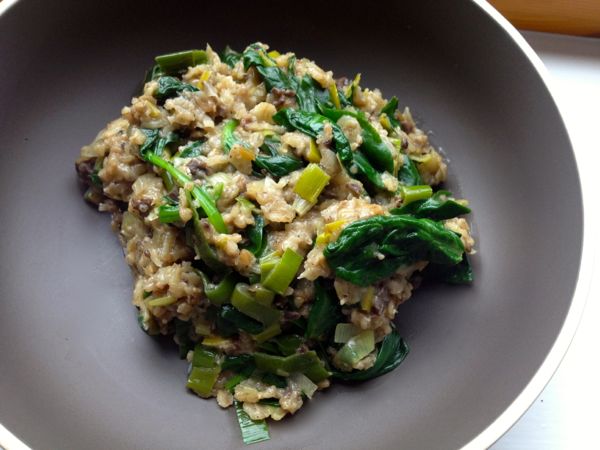
skirlieFollowing on from the fried porridge a few weeks ago, I have a bag of beautiful Flahavans oats in the house and an even bigger urge to eat oats than usual so I’ve been dying to try out a skirlie recipe for a while. Getting given a bag of wild garlic from a foraging friend the other week meant the time had come for a simple filling post Easter dinner.

Skirlie is a Scottish dish where oats are toasted in a hot pan before having water or stock added to plump them up and turn them into a chewy almost risotto like dish. Wholesome and incredibly filling, it’s a great way to use up odds and ends but without the constant stirring of a risotto.

A delicious dish, it isn’t much of a looker if I’m honest and it needs something green and gorgeous to lift it and make it more appetising. I usually wilt some spinach into it but wild garlic seemed perfect as it’s still just in season and adds tonnes of flavour. You could use any green leafy veg such as shredded kale, cabbage or beetroot tops.

Like most dishes a little bacon scattered through it is excellent but if you have some leftover haggis then you are in for a treat. It melts into the oats, adds a peppery kick and lends it all a stunning smooth creaminess that takes peasant ingredients and turns them into a dinner that feels extremely luxurious indeed.

Wild Garlic Skirlie (serves 2)

  • 25g butter, lard or bacon fat
  • 1 large leek
  • 1 small onion
  • 200g porridge oats
  • 400ml water
  • 100g haggis (optional)
  • 200g wild garlic

Melt the fat in a cast iron frying pan or skillet and when it bubbles gently, add the leek and onion and sweat it all down over a low heat for about 10-12 minutes. You could add a little fresh thyme here if you had any.

Once the alliums are sweated down and starting to reduce in size, add the oats in and stir well to coat them with the fat and toast them. Stirring continually, cook them for about 3-4 minutes until they soak up the fat and begin to smell toasty and golden.

Splash in a little of the water at a time, allowing it to soak into the oats each time. Stop and allow it to cook out if the oats start to look sticky. When you have about 50ml left, crumble the haggis into the pan as well. Add the remaining water and stir it all through. Allow to cook for 2-3 minutes more.

Wash the wild garlic well and put it in the pan with the skirlie. Put a lid on it if you have it and allow it all to wilt down for a few minutes. Serve the skirlie immediately in bowls and eat. Peppery enough from the haggis it needs no more seasoning. Enjoy and marvel at how uncannily filling and simple skirlie is.


Panada


IMG_3944Christmas week tends to be quite hectic. Lots of socialising, lots of eating, maybe even a wee glass or two of something to lubricate it all with. By the gap between Boxing Day and New Year’s Eve I am often craving simple comforting food to balance out my yearly festival of meat and red wine.

Usually I go for boiled rice, but this year a conversation with family friends reminded me of the childhood dish of panada. A steaming dish of stale bread soaked in boiling water and covered in hot milk, before being sprinkled with sugar, it was designed to warm you up and fill you up. I associate it with my mum’s side of the family and she used to make it for her father when he came in from the farm in the evenings, hungry after dinner.

I thought it was an entirely Northern Irish dish and then a quick Google to see how to spell panada told me it was the very opposite. This dish is global. Panada comes from the Spanish word for a bread soup and I have no idea why the name would stick in Norn Iron when the dish is known through England as bread and milk. This was constantly mentioned in the Enid Blyton books I adored as a child, but I assumed it was a slice of loaf and a beaker of milk like a light snack, but the internet led me to see that Nigella Lawson has a recipe for it in Feast and a whole new world of comfort food was opened up to me.

This Chowhound thread shows that the dish is universal throughout Europe and North America in various forms, even forming the basis of the dish milk toast and it seemed even more apt that I make it to soothe the soul after a eating spree. I may well revisit the cornbread version at some point as I think it would suit the soft texture beautifully. I made mine traditional apart from the twist of a sprinkle of cardamom that lifted it from bland to fortifying. Whatever you call it, don’t miss the chance to make it as a simple supper or a warming breakfast instead of porridge.

Panada (serves 1)

  • 1 thick slice of white bread, cubed
  • 180ml boiling water
  • 50ml milk
  • 1 pod green cardamom, seeds bruised
  • 1 teaspoon vanilla extract (optional)
  • 3 teaspoons caster sugar

The most important thing about this dish is to use decent bread. Don’t use the kind of white sliced Kingsmill or Hovis make or it will turn into paste. Even the kind of unsliced white batch you get in supermarket bakery counters is much better, but if you have some sourdough, that would be ideal. I used the leftover heel of the slow cooker bread I made.

Cube the bread into 1/2 inch pieces and in a heatproof bowl, pour the boiling water over it. Allow to sit and absorb the water for about 2-3 minutes. Don’t stir or agitate it, just allow it to soak up the water and plump up gently.

While the bread is soaking, warm the milk, vanilla and cardamom seeds together until the milk is just about to bowl. Remove from the heat. Check the bread and drain off any excess water using a potato masher. Pour the piping hot milk over the bread and scatter with the sugar and nutmeg. Serve immediately as the sugar remains slightly crunchy and enjoy the taste and texture of childhood again. Although I suspect it make an excellent hangover cure if you’ve been being very adult….